Simple Charcuterie Board
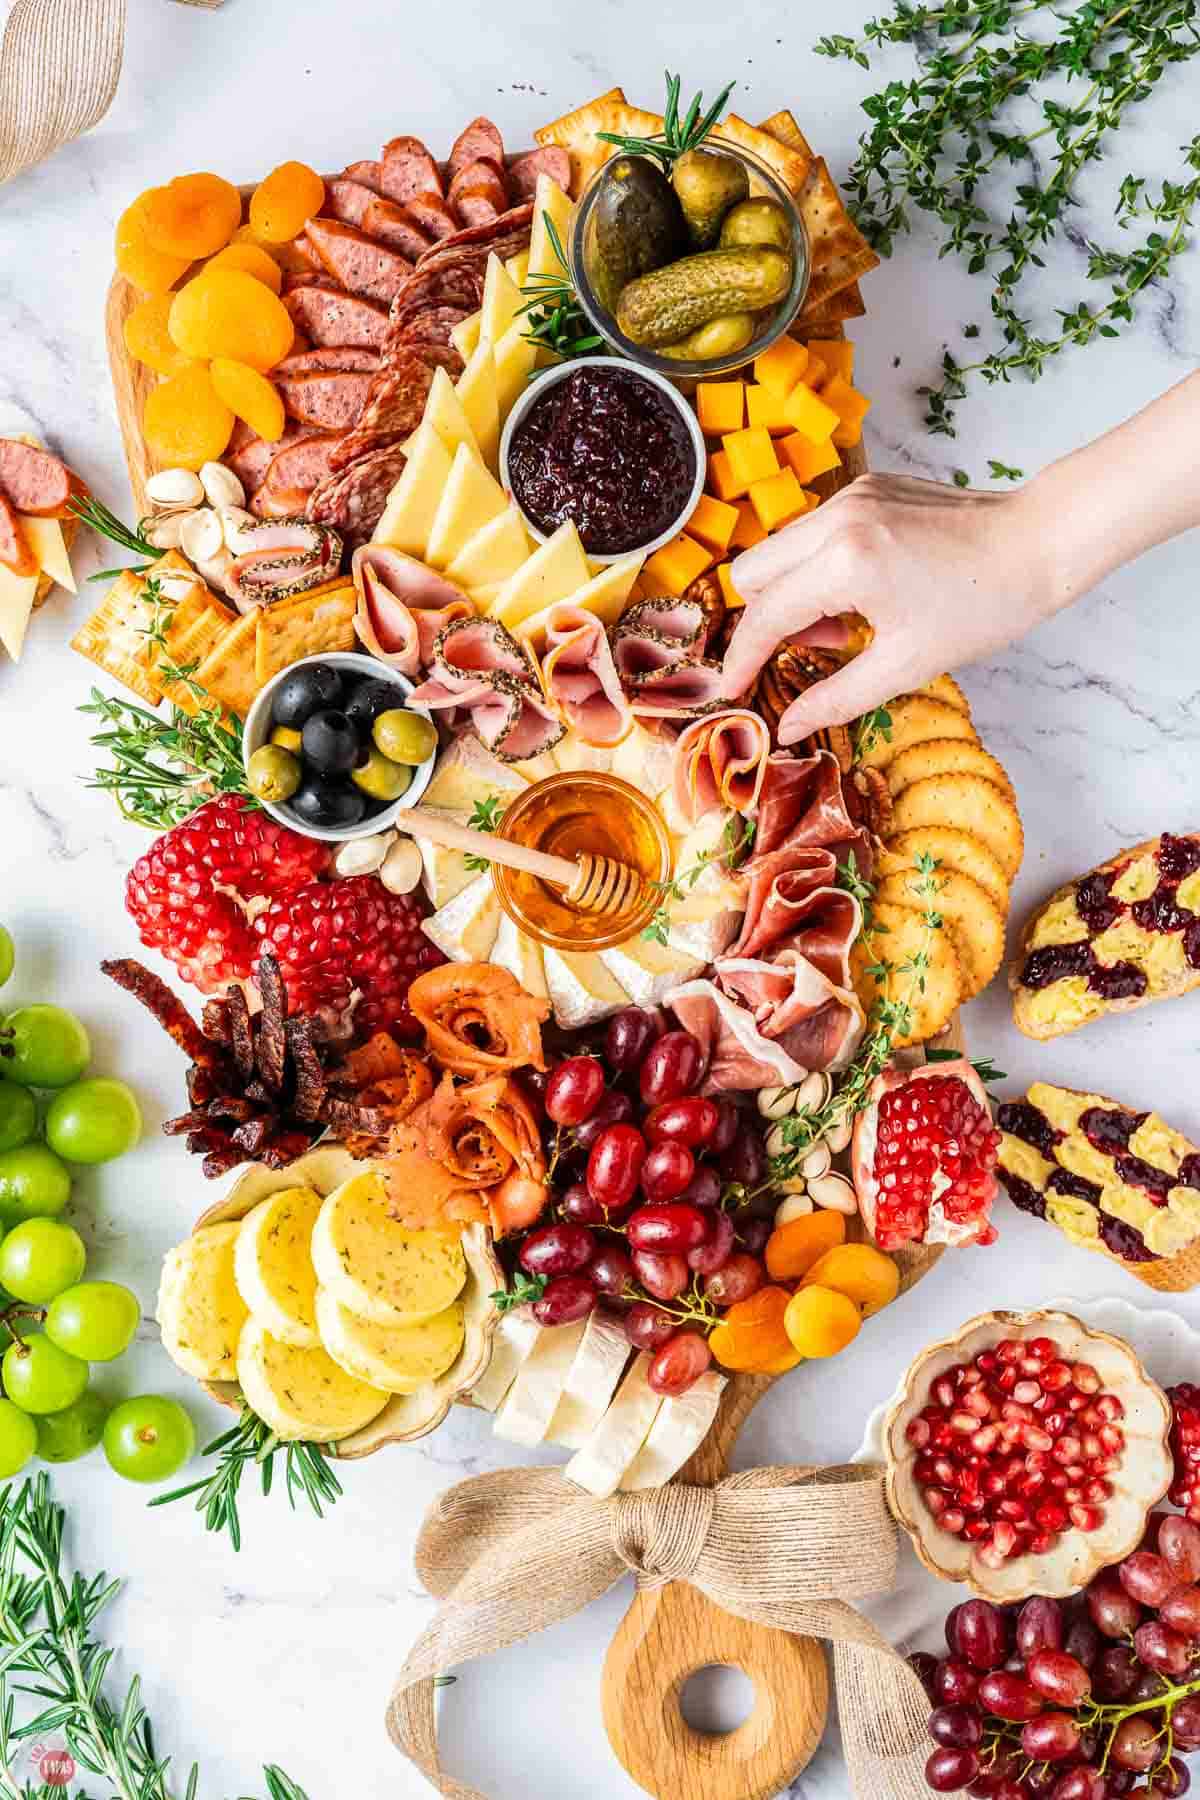
A charcuterie board is a no-cook entertaining platter with cured meats, artisan cheeses, fresh and dried fruits, crackers, and nuts arranged for grazing. Takes 20-30 minutes to assemble, feeds 8-12 people as an appetizer, and requires zero cooking or reheating. Perfect for parties, holiday gatherings, or game day when you need an impressive spread that lets you enjoy your guests instead of staying stuck in the kitchen.
Your friend invites you to a party. You ask “What can I bring?” even though you don’t want to cook and whatever they say requires a store run. They respond with “whatever” or “an appetizer.” That doesn’t help. Like I tell my husband, there are no recipes for “whatever!”
But actually there is. A charcuterie board has something for everyone! But before you start thinking, I can’t make one of those “Instagram-worthy” cheese boards, I’m here to tell you that you can!
And I am here to help with some tips and tricks to help you assemble the best appetizer at the party, and secure you an invite to the next one.
More Party Boards
- Crudite Platter – Fresh vegetables with dip
- Relish Tray – Classic pickles and olives spread
- Antipasto Platter – Italian meats and cheeses
- Mezze Platter – Mediterranean dips and spreads
- Butter Board – Trending spreadable butter creation
- Sundae Board – Sweet dessert board version
This post may contain affiliate links. As an Amazon Associate, I earn from qualifying purchases at no additional cost to you. Read my disclosure policy.
When building a charcuterie board I follow the “3-3-3-3” rule. 3 meats, 3 cheeses, 3 crackers/breads, 3 extras like fruit, olives, jams, and nuts. Every great charcuterie board includes 3 of each of these.
It may seem like a lot of items. This creates variety without overwhelming you or your guests. If you have more than three of each category and decision fatigue sets in. They should enjoy tasting items, not feel like it’s a test.
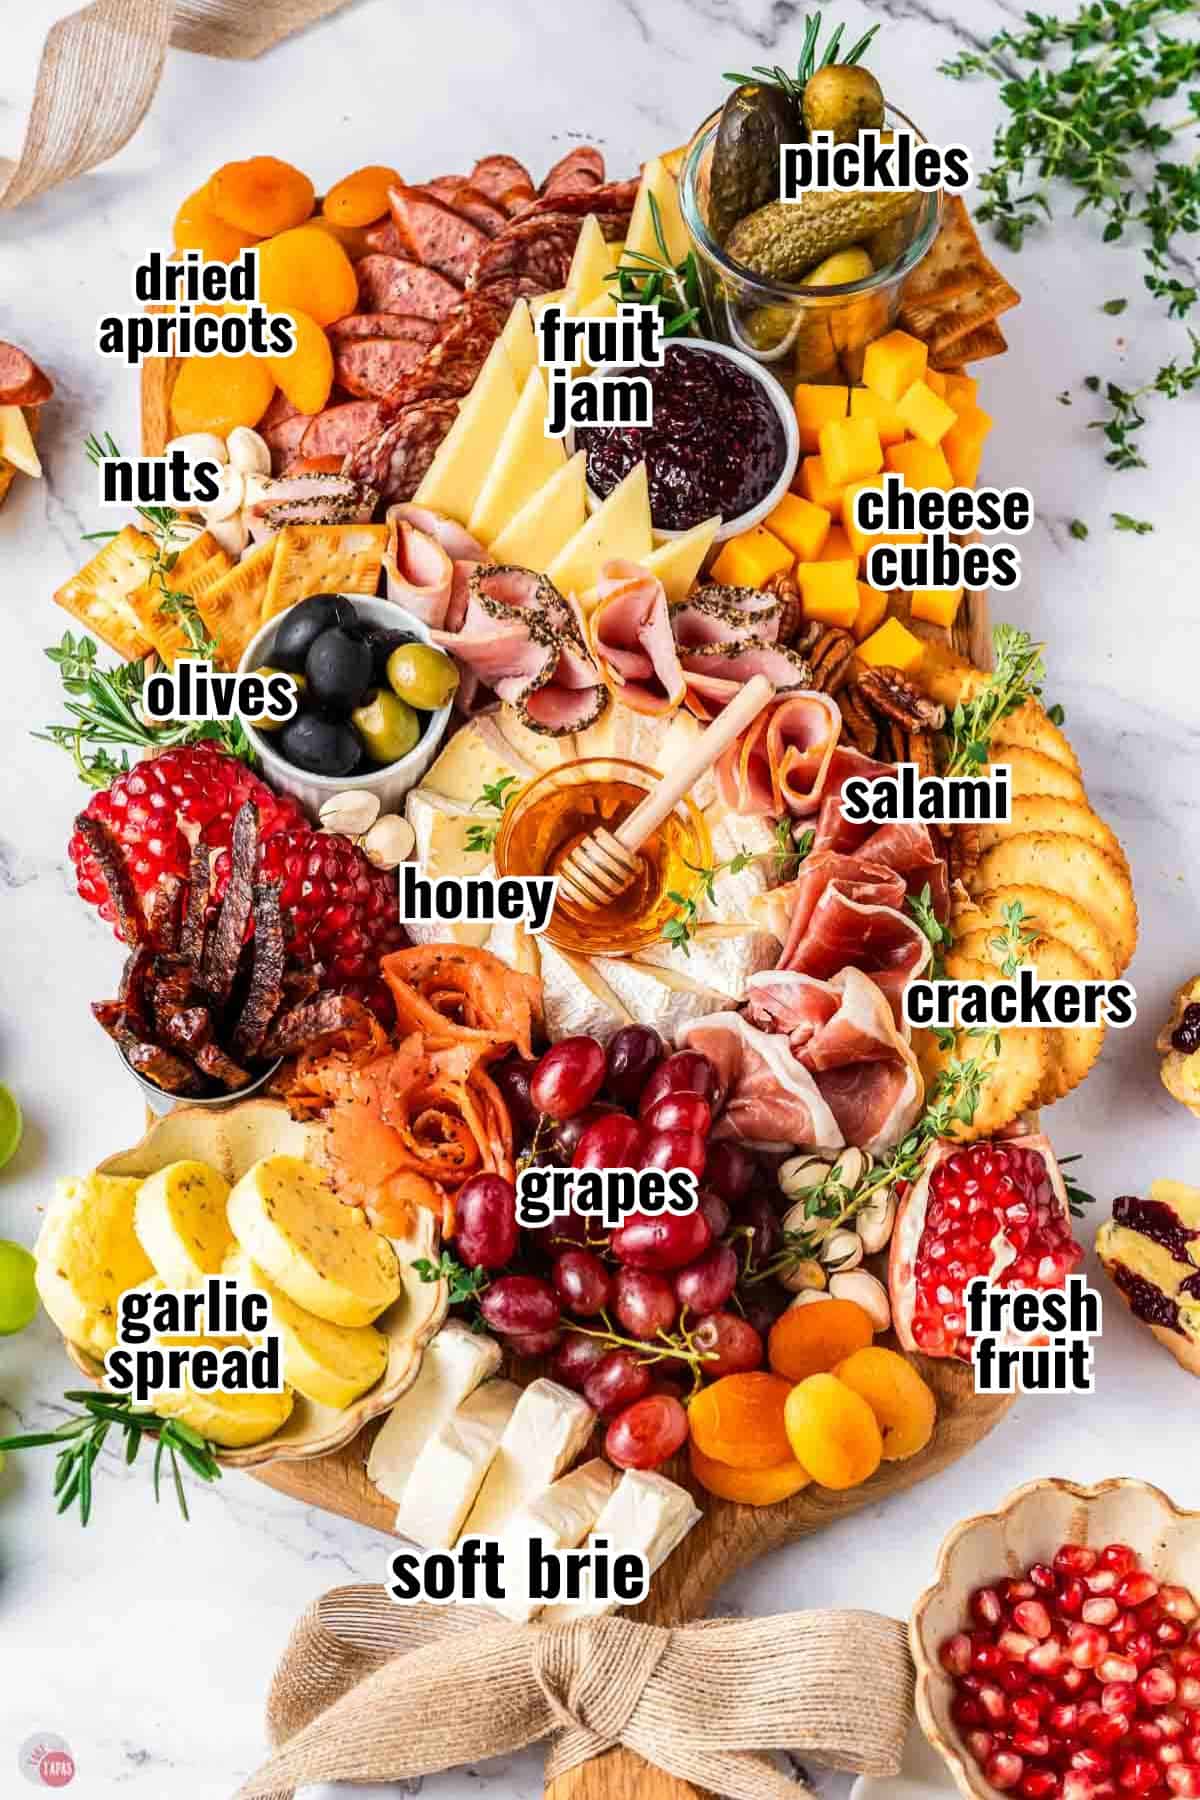
The Most Common Components:
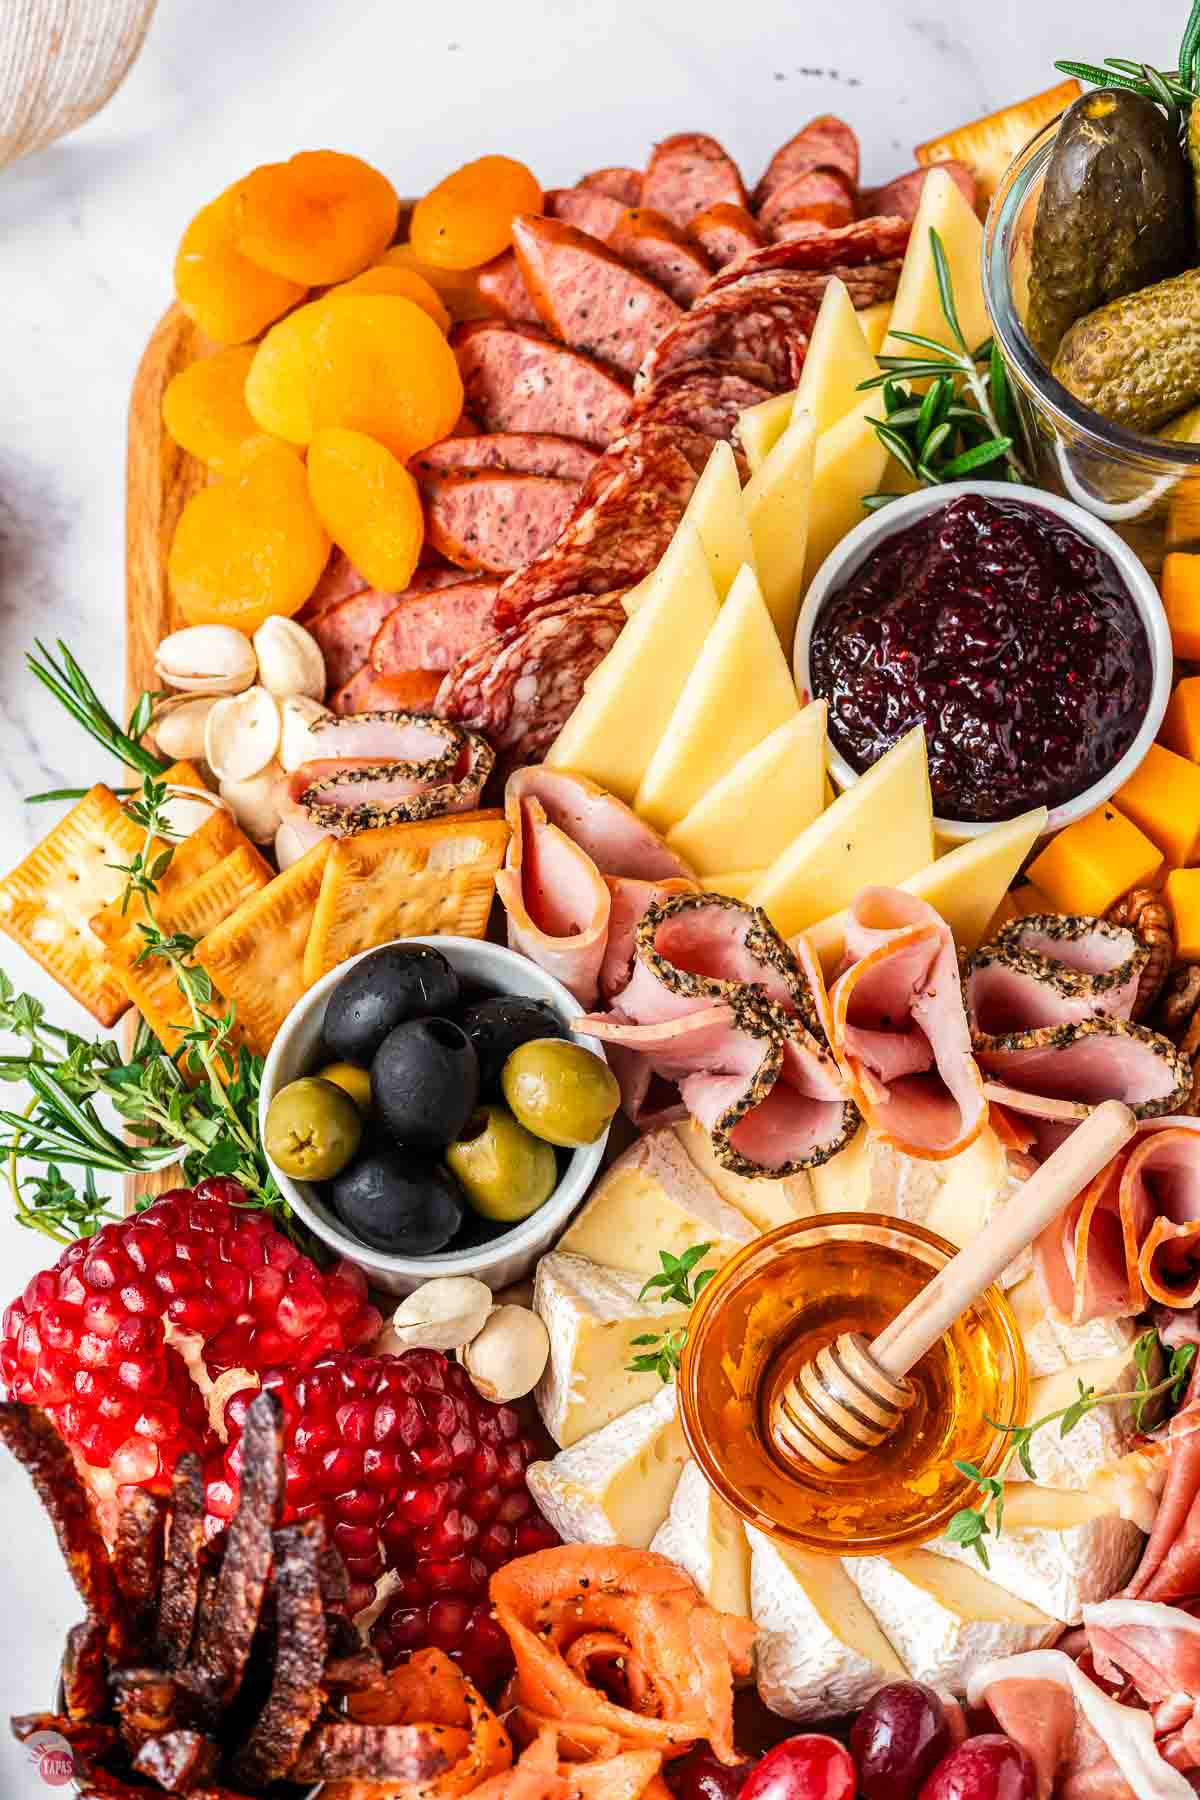
Meats: Cured meats like prosciutto, salami, soppressata, and pepperoni. Other ones I like to use are small smoked beef sticks, sliced summer sausage, and chorizo.
For something different try turkey, ham, roast beef, and even smoked salmon.
Pro tip: I’m a sucker for cured Italian meats. Salami and pepperoni always make my boards and they are usually liked the most.
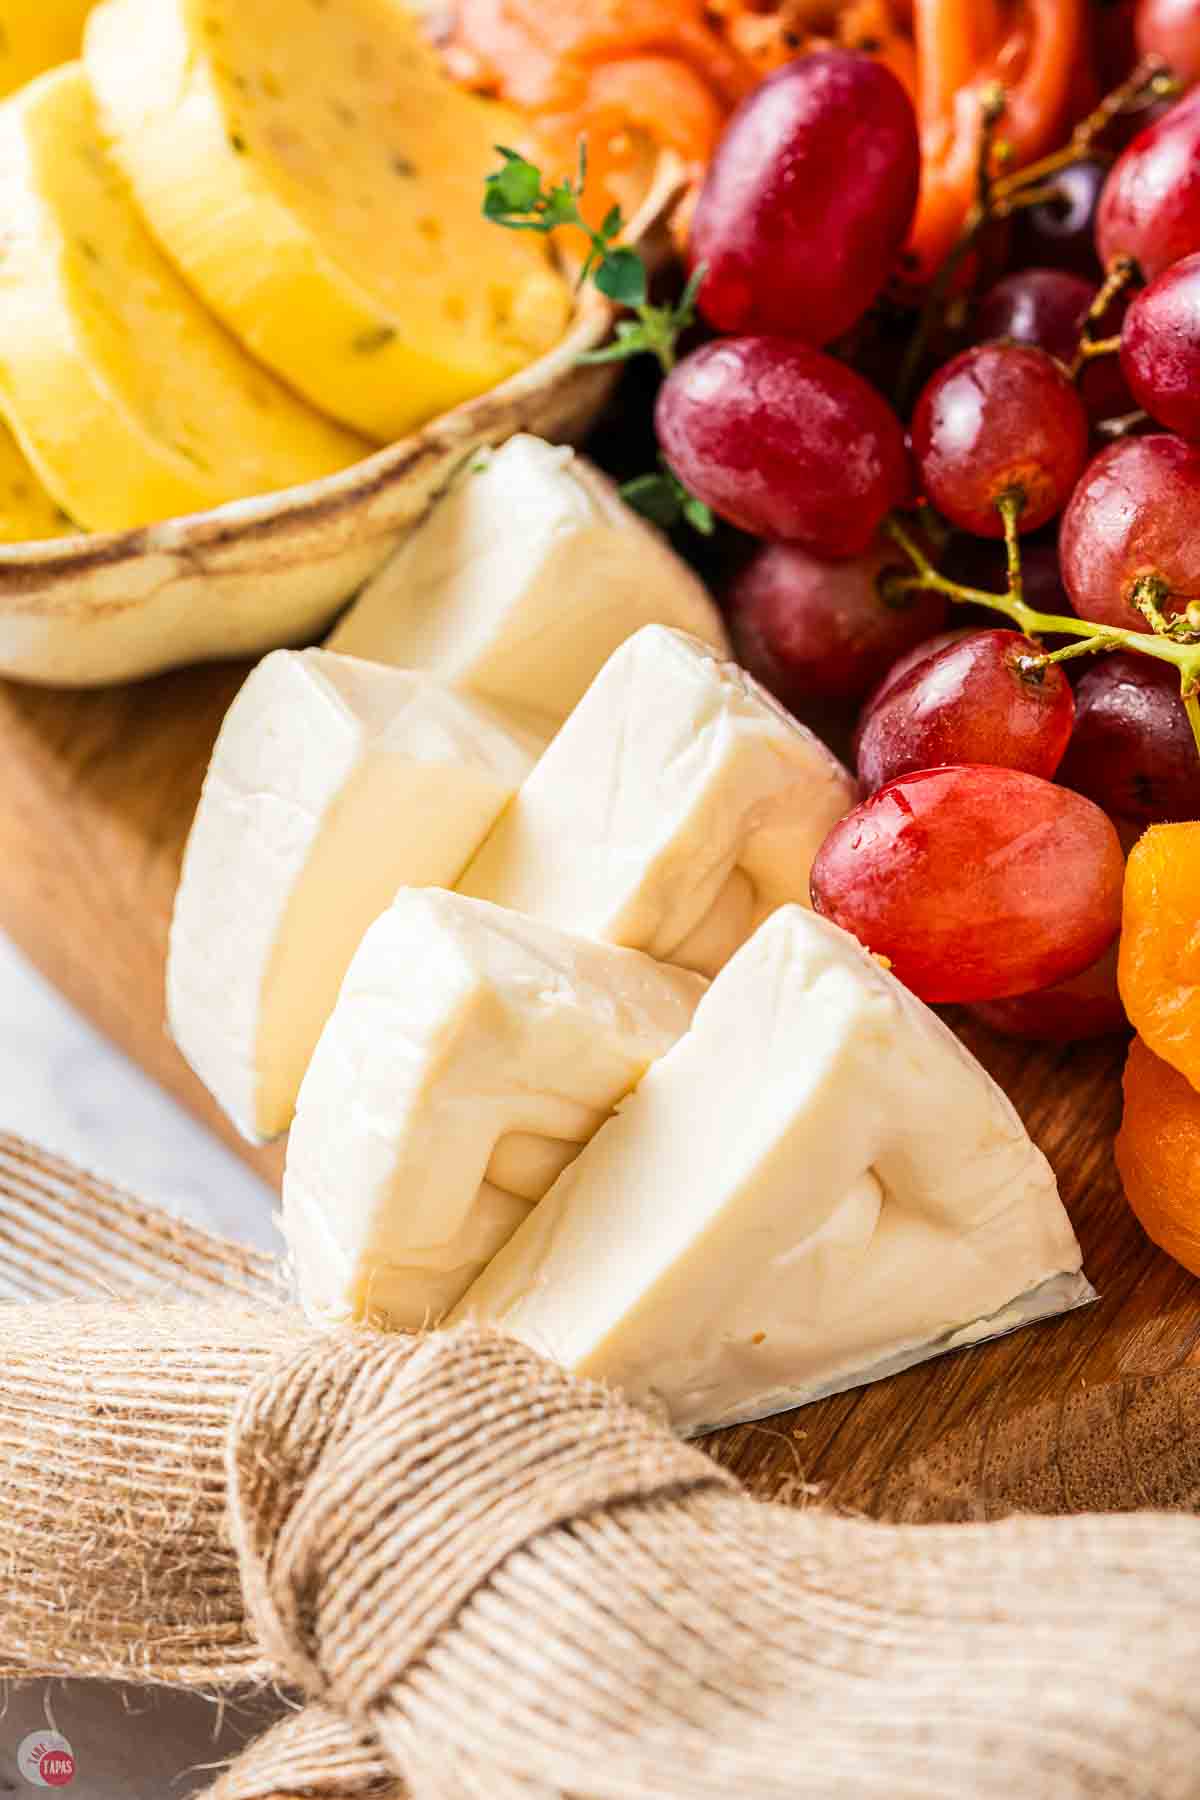
Cheese: I like to choose one hard, one semi-soft, and one spreadable cheese. Don’t overthink it, just grab three cheeses you like. Most people love the spreadable cheese, so I always include one of those.
- Firm cheeses to try are aged cheddar, smoked gouda, Manchego, Gruyere, Aged provolone, and Parmesan.
- Semi-soft cheeses like Brie (crowd favorite, most common), Camembert, Blue cheese (bold, not for everyone), Havarti, and mozzarella.
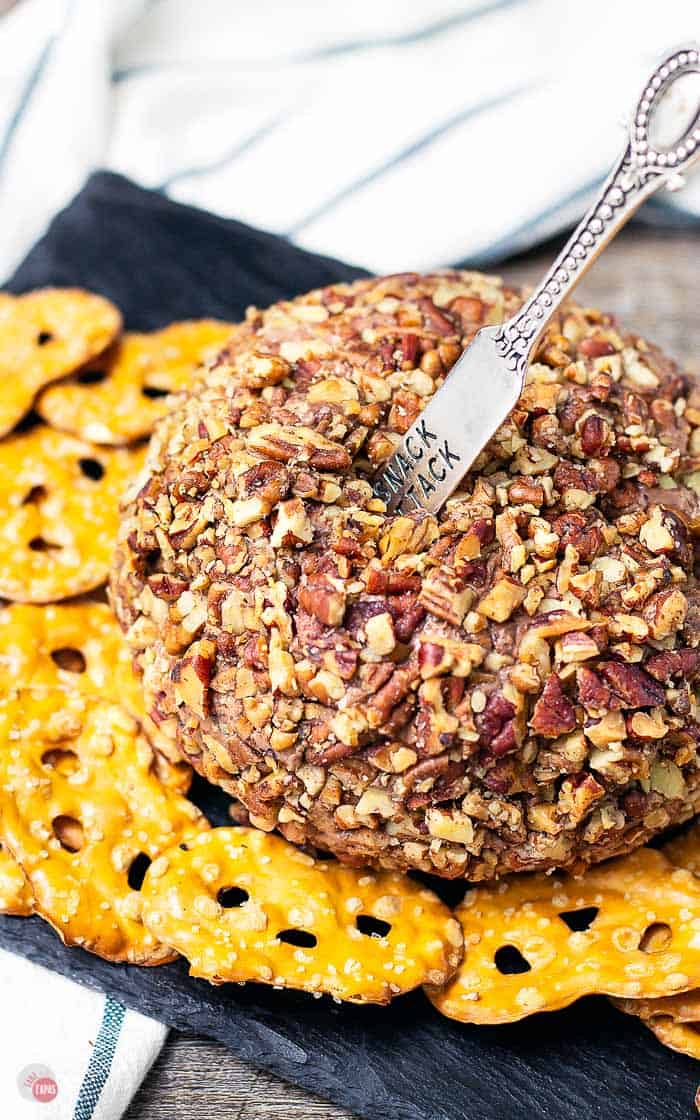
- Soft & spreadable cheeses include goat cheese, herb cheese spread like Boursin (already prepared, garlic herb is a fave), and cheese balls. You can’t go wrong with a ranch cheese ball or get spicy with a jalapeno popper cheese ball.
Buy block cheeses when possible. You can cut it into a variety of shapes (cubes, slices, squares, or triangles) and it doesn’t dry out as quickly. as needed.

Crackers & Breads: Pick three different shapes and textures. These are the food cars that get the meat and cheese to your mouth so get the ones you like the best.
Start with some basics like water crackers, wheat crackers like Triscuits, crackers with seeds/nuts, and herb crackers for flavor.
If you want to try something different, include some pita chips, bagel chips, pretzels like Pretzel Crisps, baguette slices, and breadsticks.
Pro tip: Get thick, hearty crackers. Thin, dainty crackers won’t hold up to creamy cheese.
Extras: These are the flavor boosters that tie everything together. Try to stick with the rule of 3 even though there are so many to choose from. I admit that I usually pick more than three since I love all of them. If you have a larger board feel free to double up.
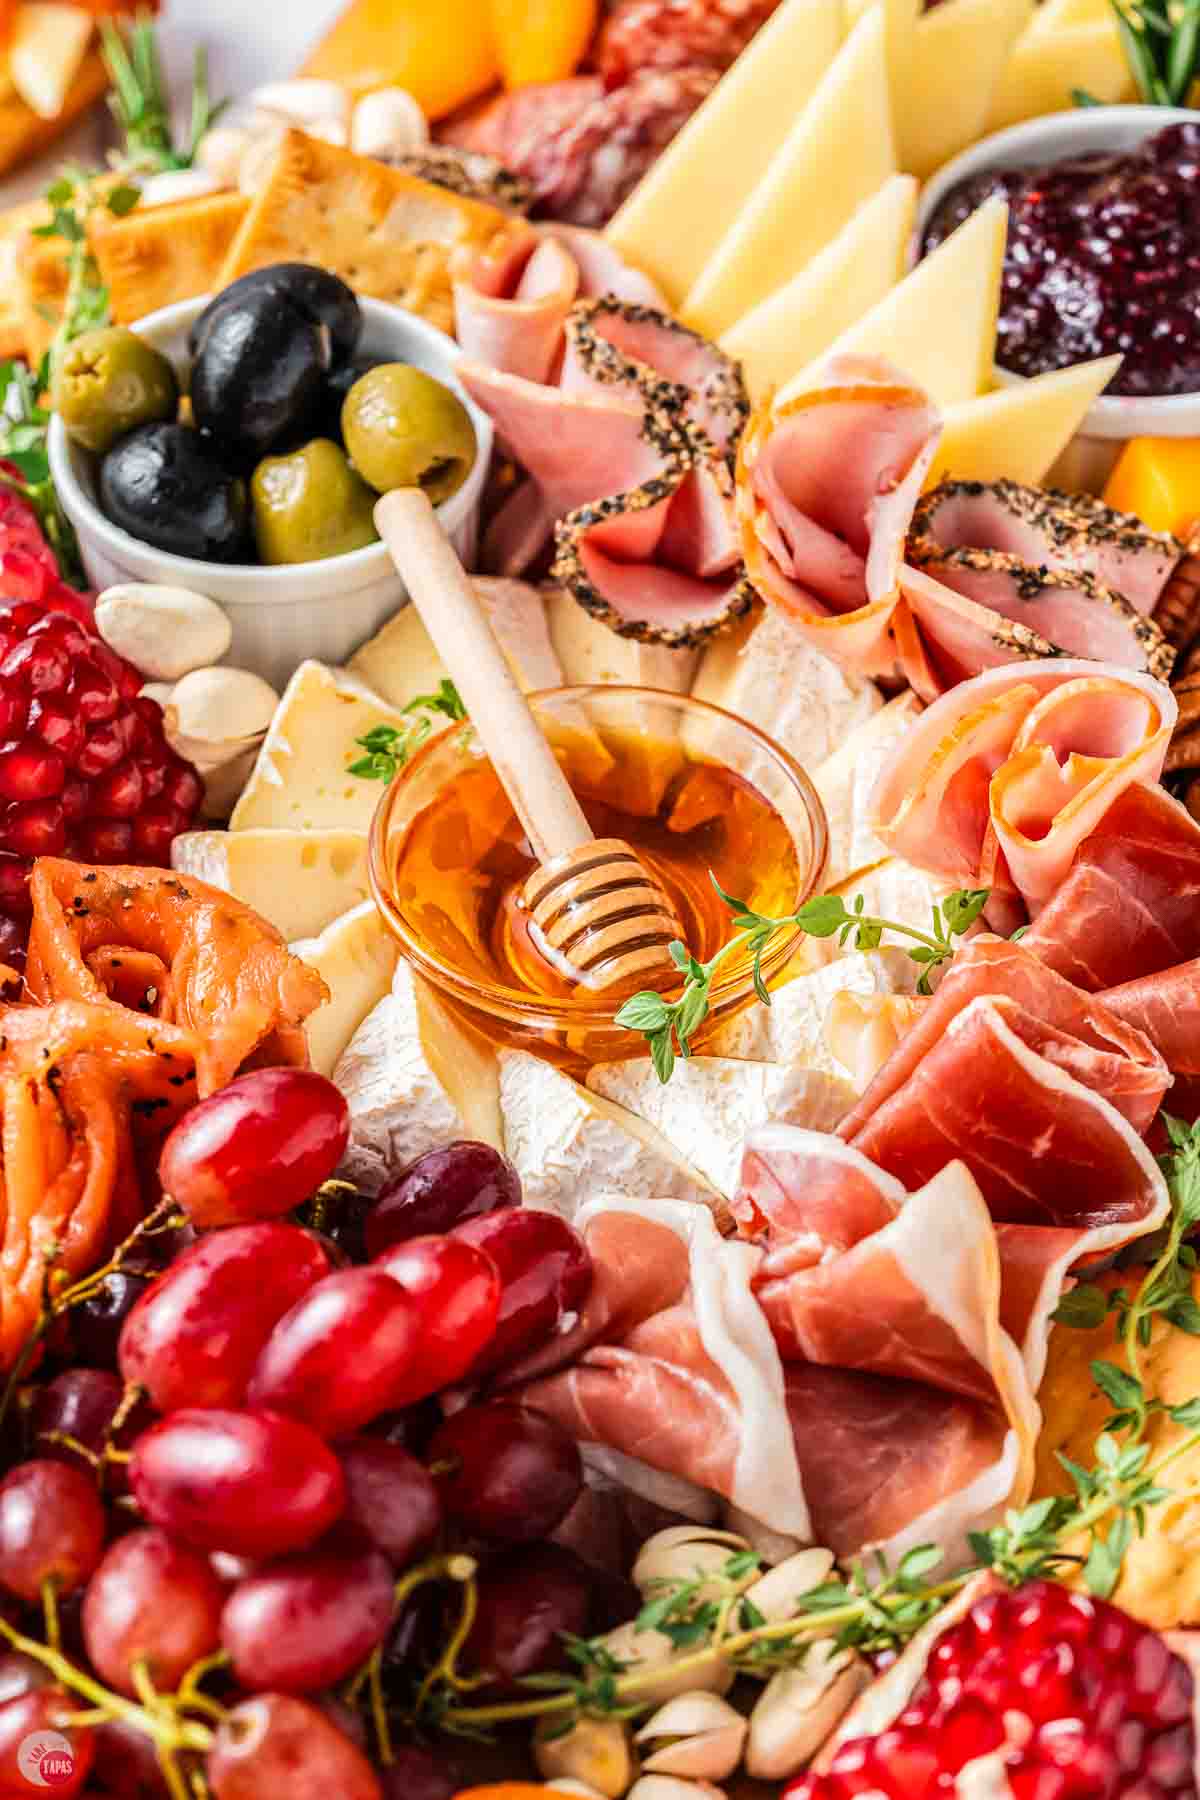
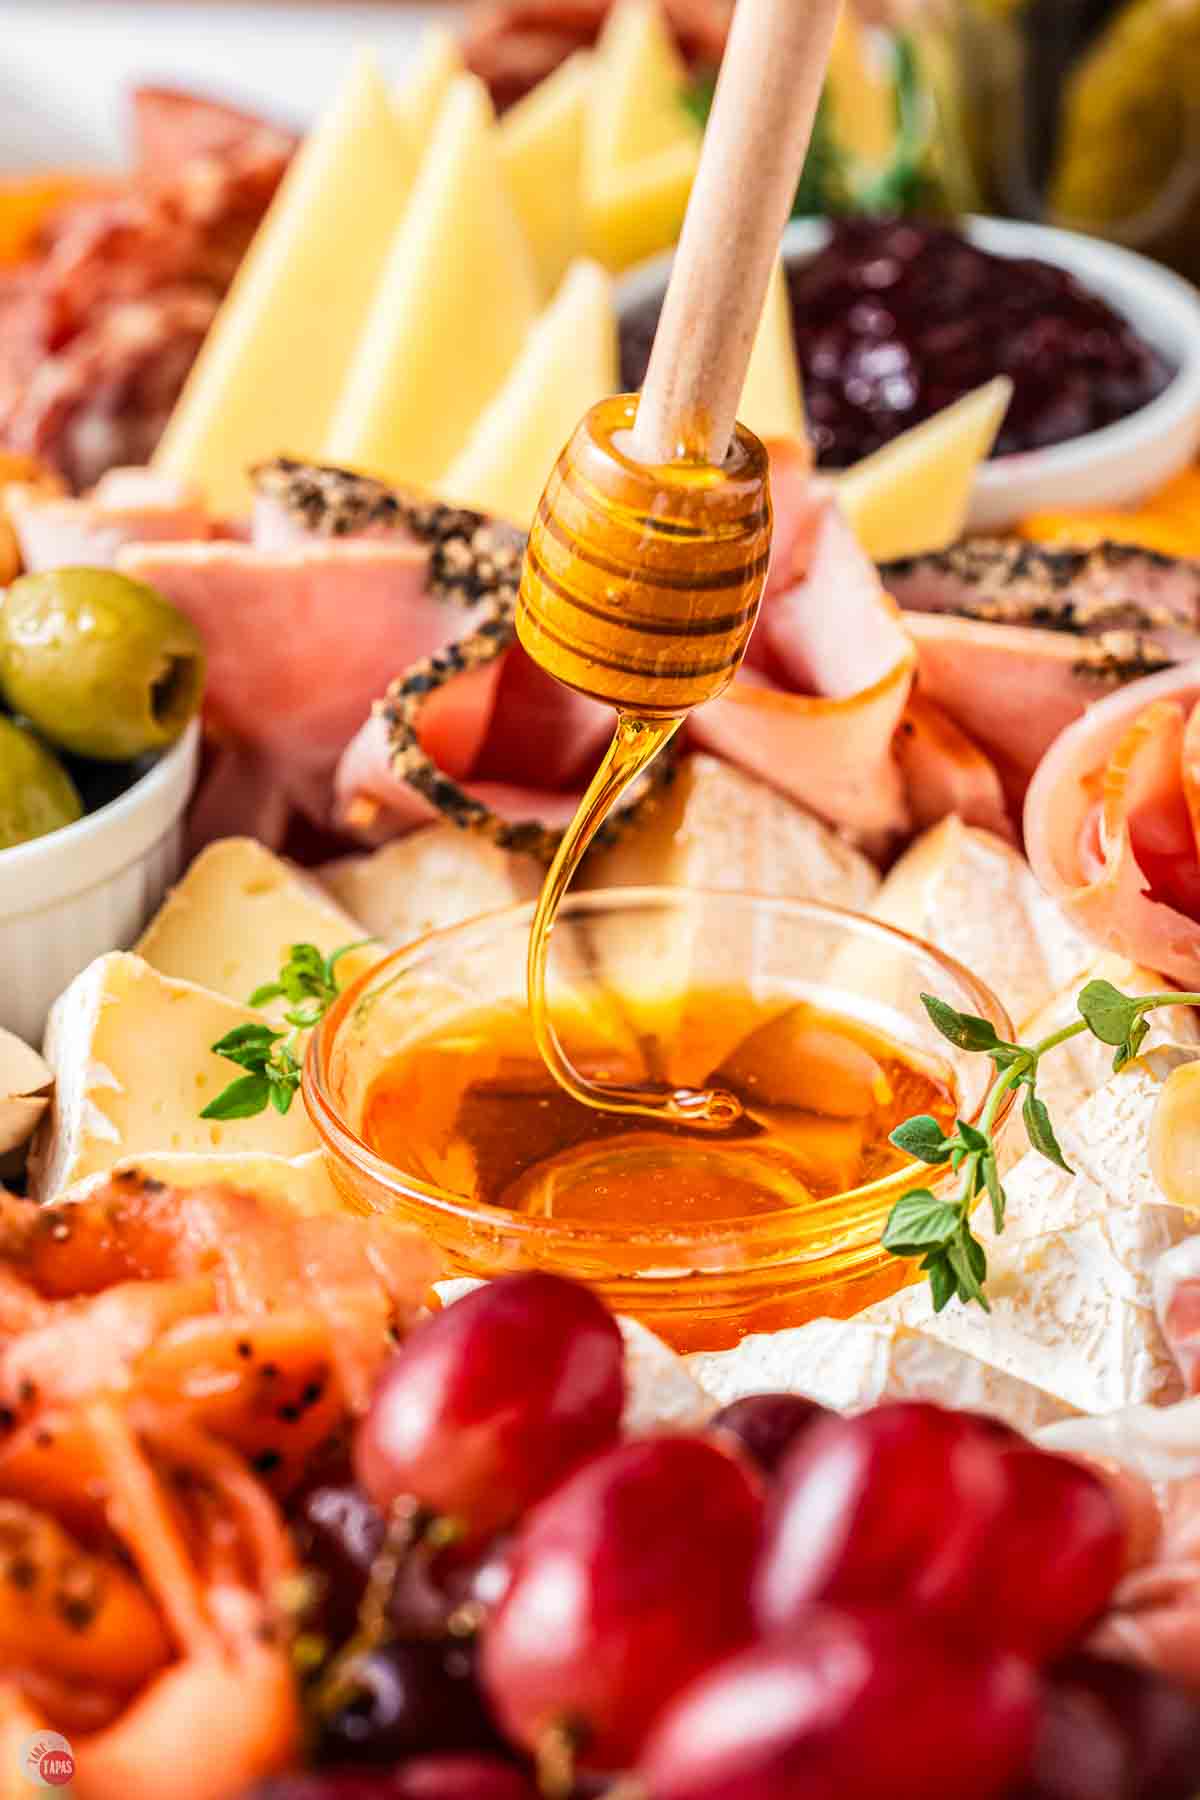
- Sweet Spreads: These can include fig jam, honey (try hot honey!), apricot preserves, sour cherry spread, and hot pepper jelly.
- Savory Spreads: Grainy mustard, honey mustard, spicy brown mustard, olive tapenade, and pesto.
- Fresh Fruits: Grapes (classic, easy to grab), strawberries, blackberries, pomegranate arils (my favorite!), apple slices, pear slices.
- Dried Fruits: Dried apricots, dried figs, dried cranberries, dates.
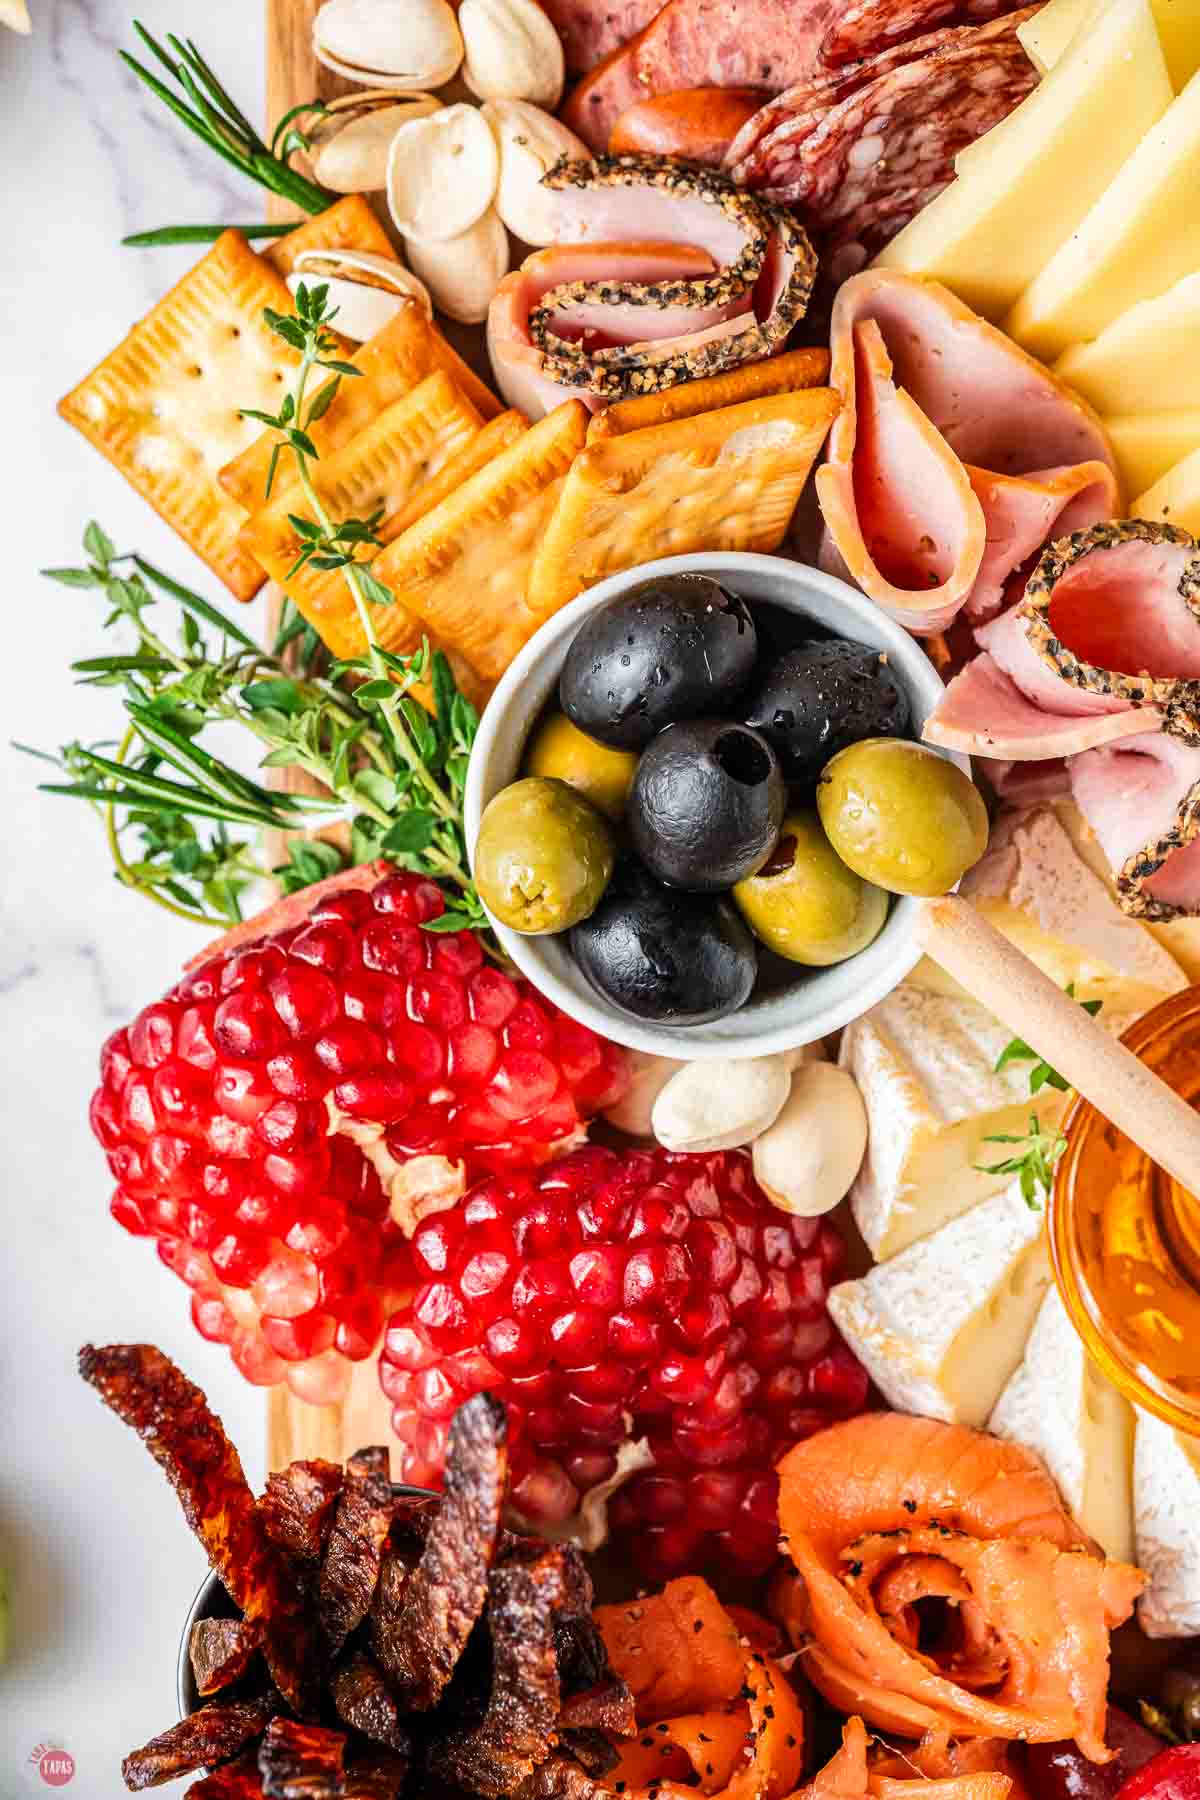
- Pickled Items: Olives (Castelvetrano are my favorite!), pickles like cornichons or slices, pickled vegetables (peppers, artichokes, onions), and capers.
- Nuts: Toasted pecans, Marcona almonds, walnuts, cashews, and pistachios.
- Sweet Items: Chocolate covered almonds, dark chocolate squares, candied nuts.
Rule of thumb: Plan for 2-3 ounces of meat and cheese per person, per hour.
For example, on a board for 10 people at a 2-hour party, I would include roughly 8 ounces of each of three cheeses and three meats. Then add in enough crackers and fruit to fill in the gaps.
If you think it’s too much, slice and prep all of it but only put out half of each to start. Then replenish the board as items get eaten.
When I catered, I learned it’s better to have too much than too little. And guests will eat it if you put it out.
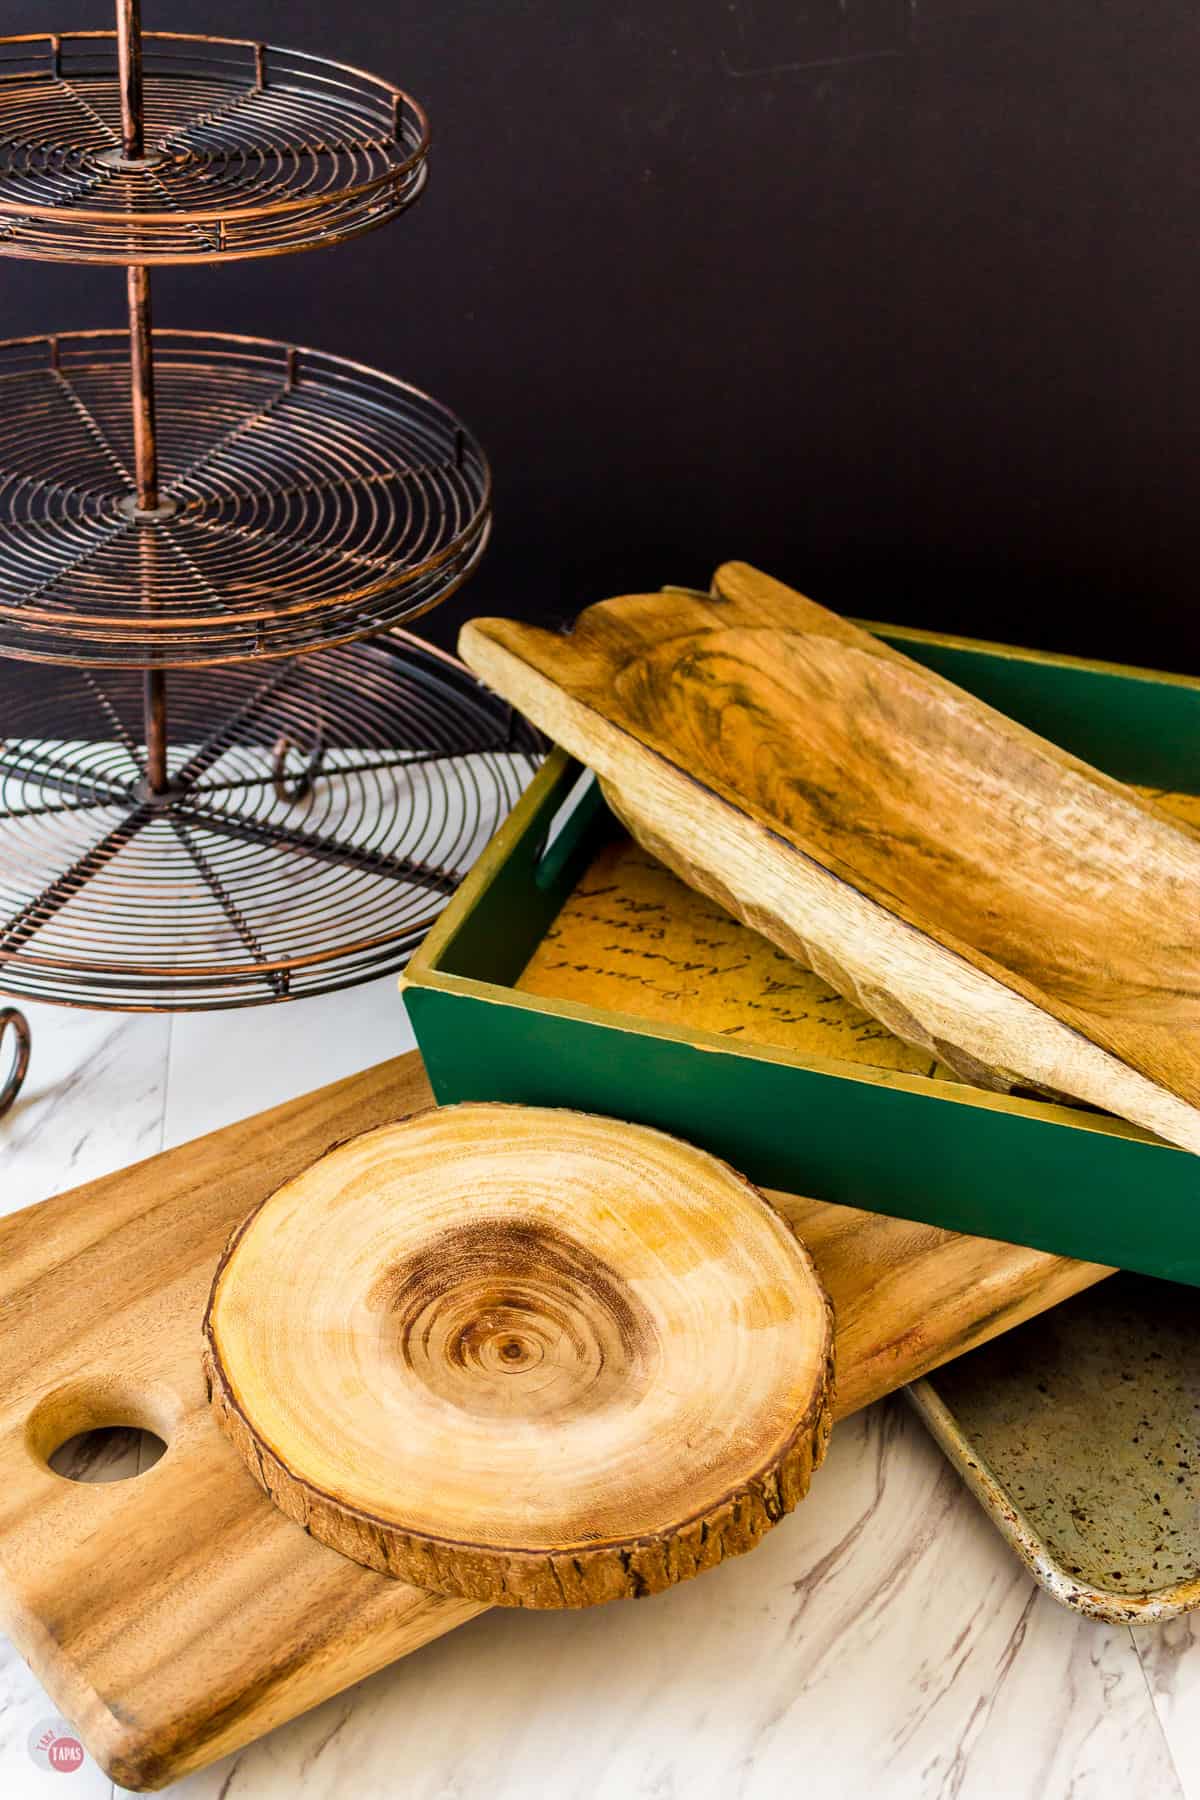
Choose The Best Board
- Choose the right size. A 8”-12” board serves 2-4 people, a 12”-16” board serves 4-6 people, a 16”-20” board serves 6-10 people, and a 20”+ board serves 10+ and is great for large gatherings.
- Use a board that is durable and easy to clean. A wood board made from bamboo, walnut, or acacia works the best because they don’t absorb the flavors of the meats and cheeses and are pretty to look at. You can always cover the board with parchment paper if it’s not food safe.
- Don’t go for the obvious. Marble slab, ceramic serving platters, cutting boards, slate (you can label with chalk), and even metal all work. I have used metal baking sheets before when I couldn’t find one large enough. Once, I used two separate serving trays for hosting a large party. I put one on either end of the large table so more guests could reach them.
- Avoid food storage containers. Glass trays and containers can get slippery and break. Plastic stains easily, they hold flavors, and look a little tacky or cheap.
For more insider tips, tricks, and a behind the scenes look, follow me on Pinterest, Facebook, Instagram, & X.
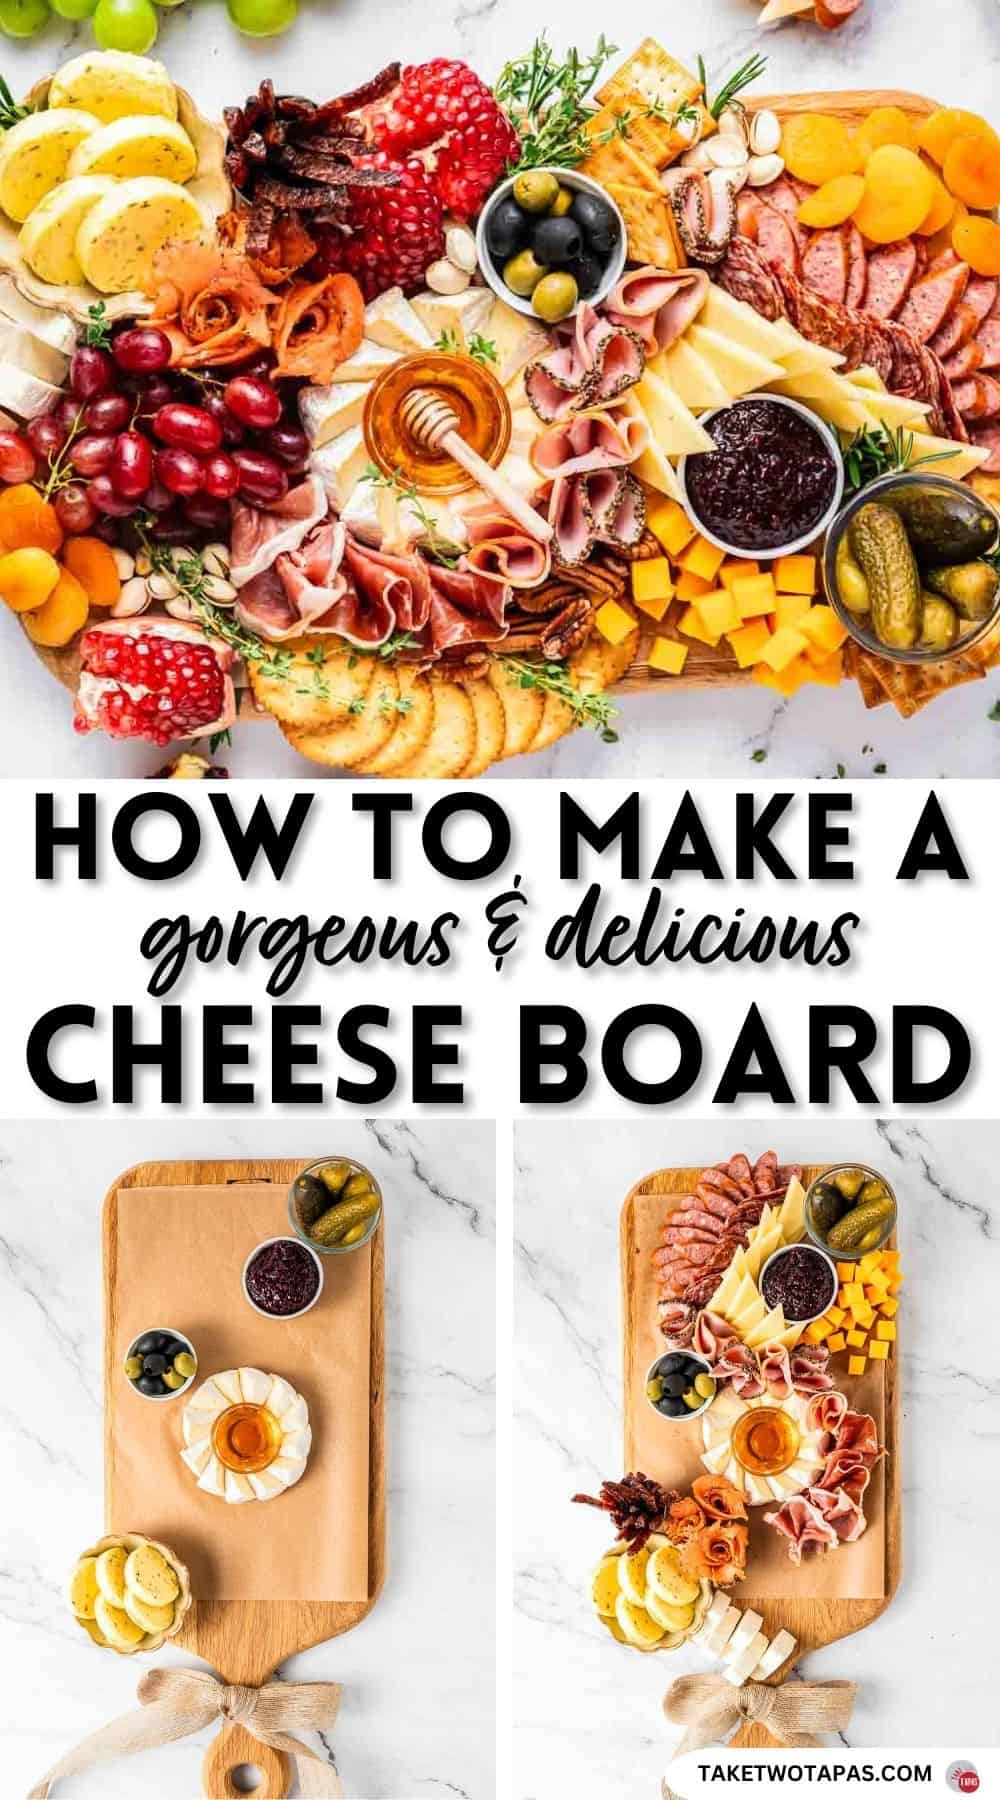
How to Build a Charcuterie Board (Step by Step)
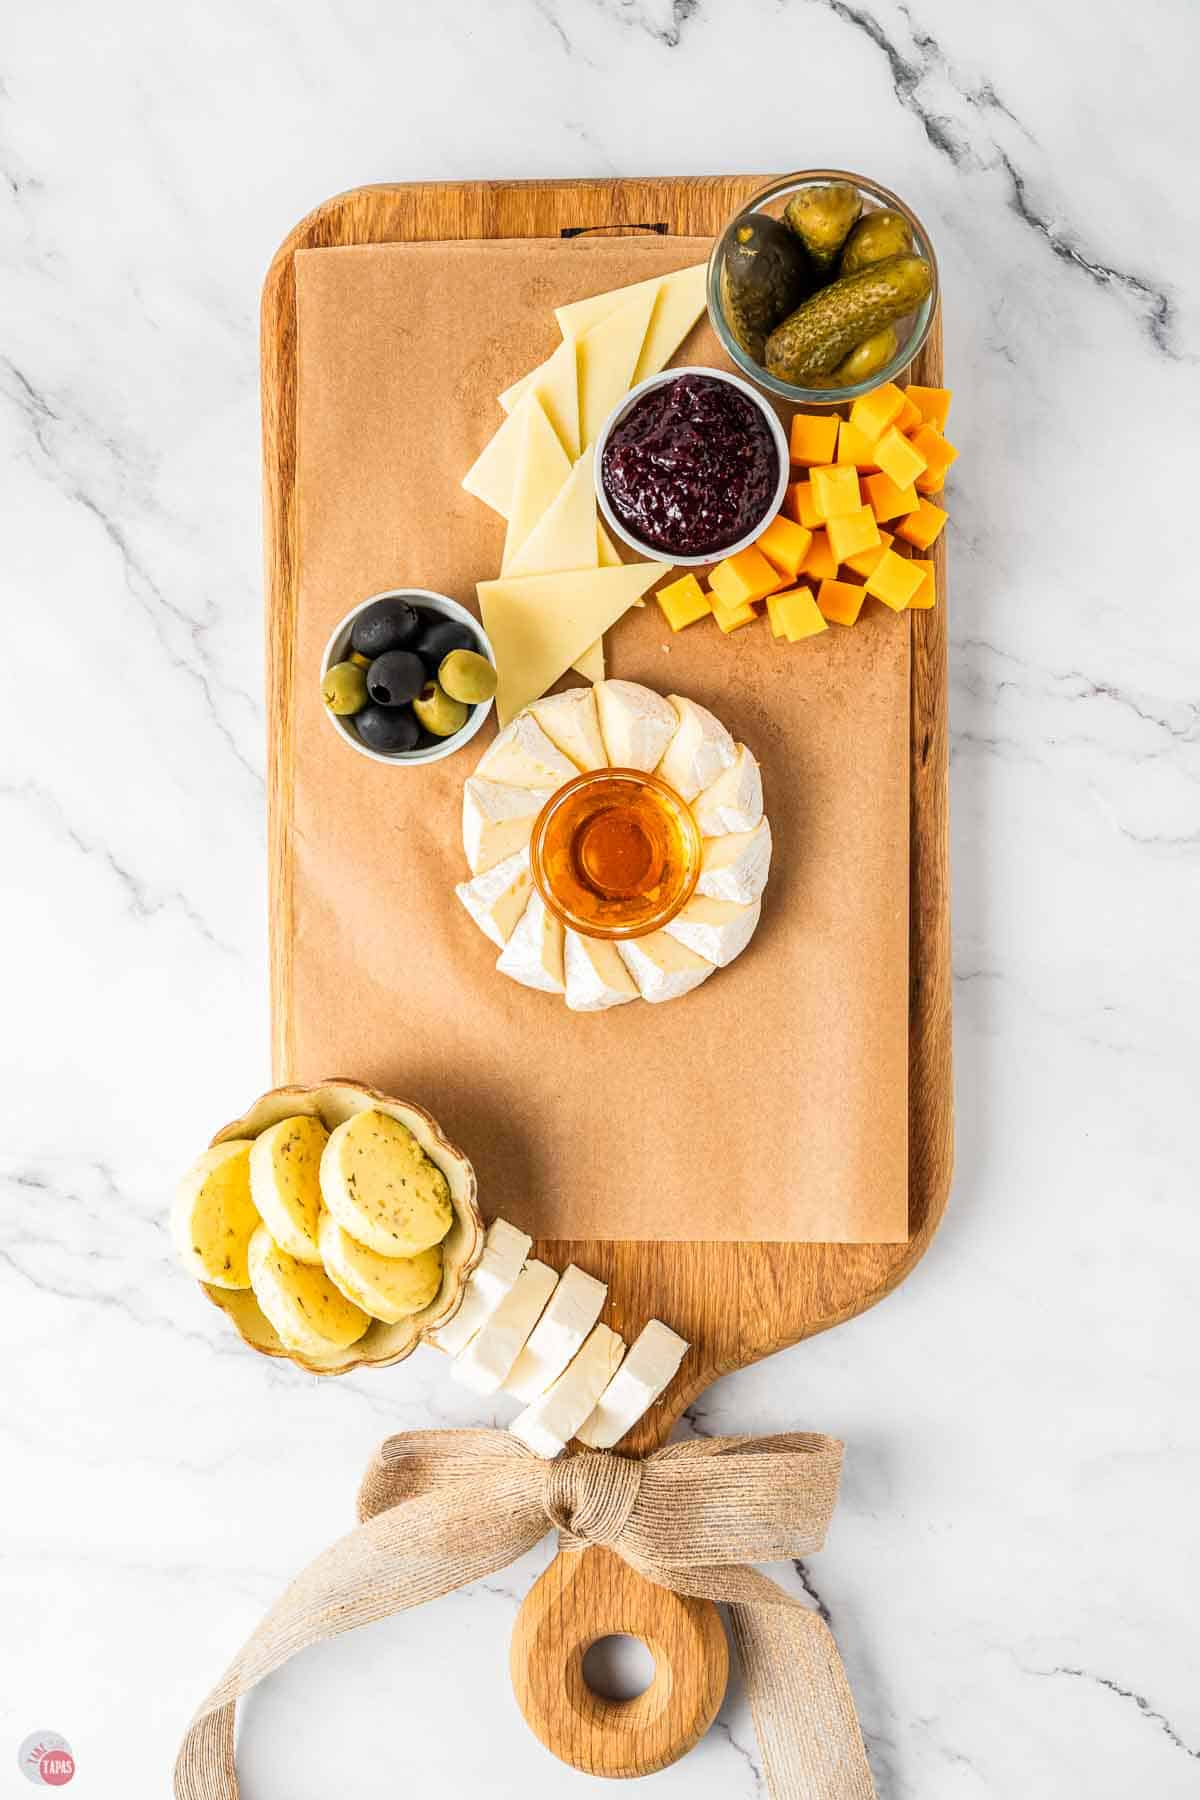
- Start with Large Items & Bowls: Your cheeses are your anchors. Space them out around the board first. Next, add anything in bowls like spreads, jams, olives, pickles, and mustards. Be sure to space these out too. I like to create three spots on the board for the cheeses/bowls and then fan everything out from those spots.
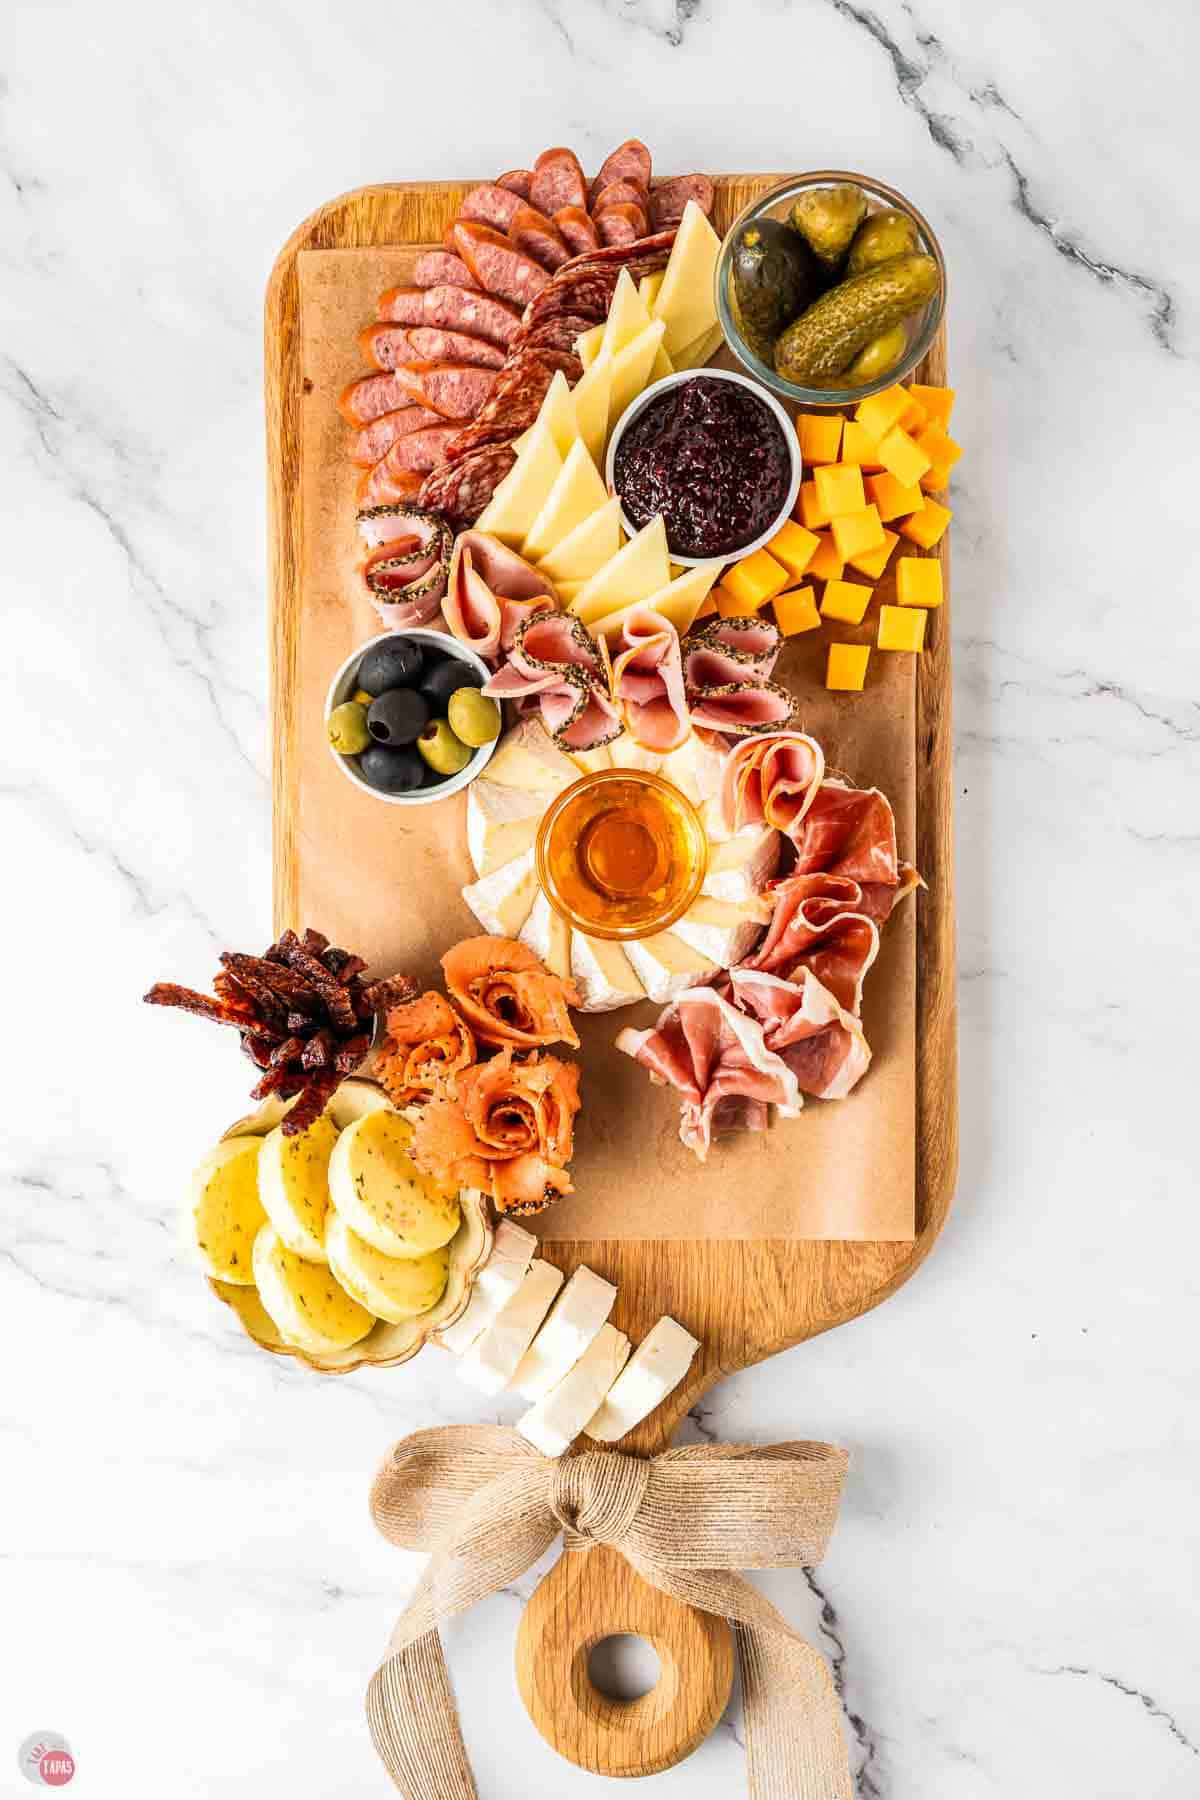
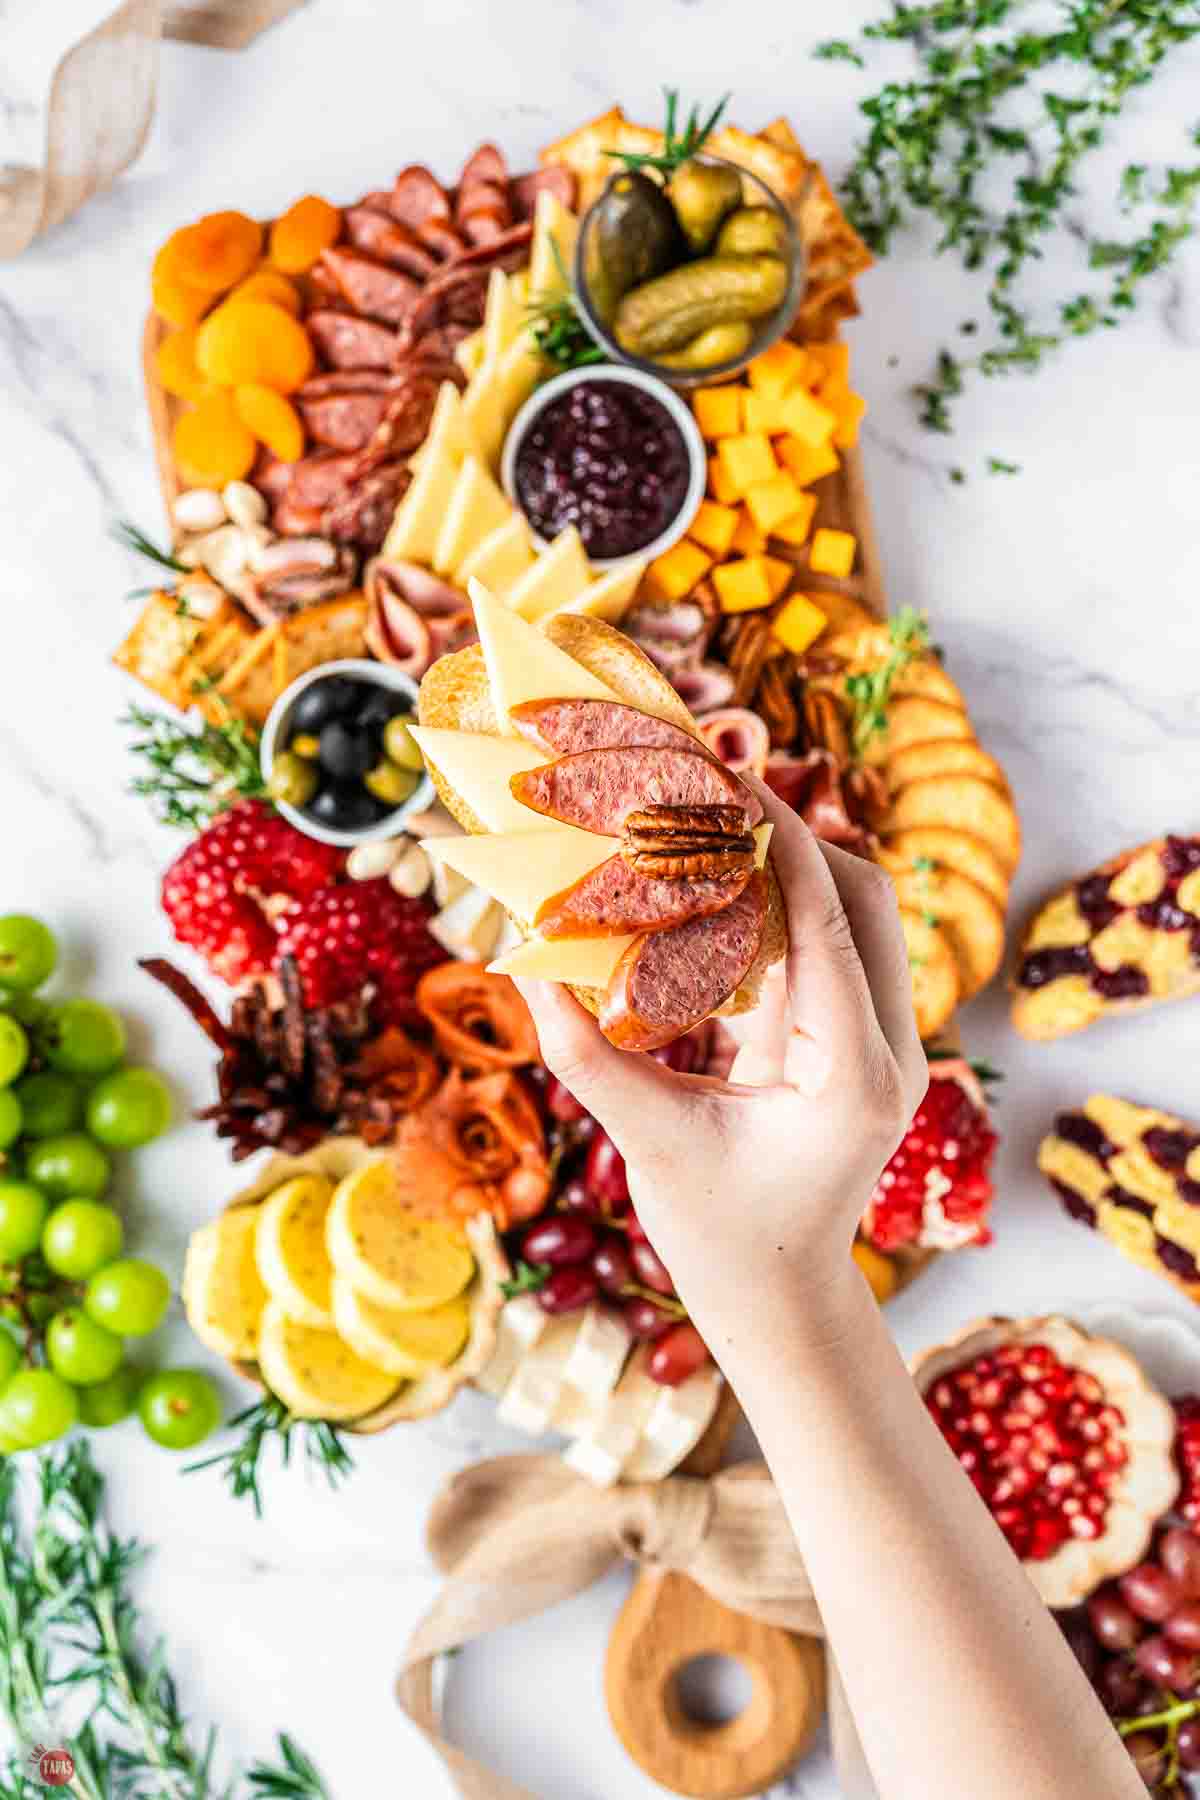
- Add Meats: Fold or fan your meats to make them look fancy. You can fold salami into quarters, fan out prosciutto in ruffled waves, roll soppressata into cylinders, stand up sausage slices in rows, or make salami flowers.
- Place Crackers: Space out different types around the board. Place them near their intended cheese or meat pairings.
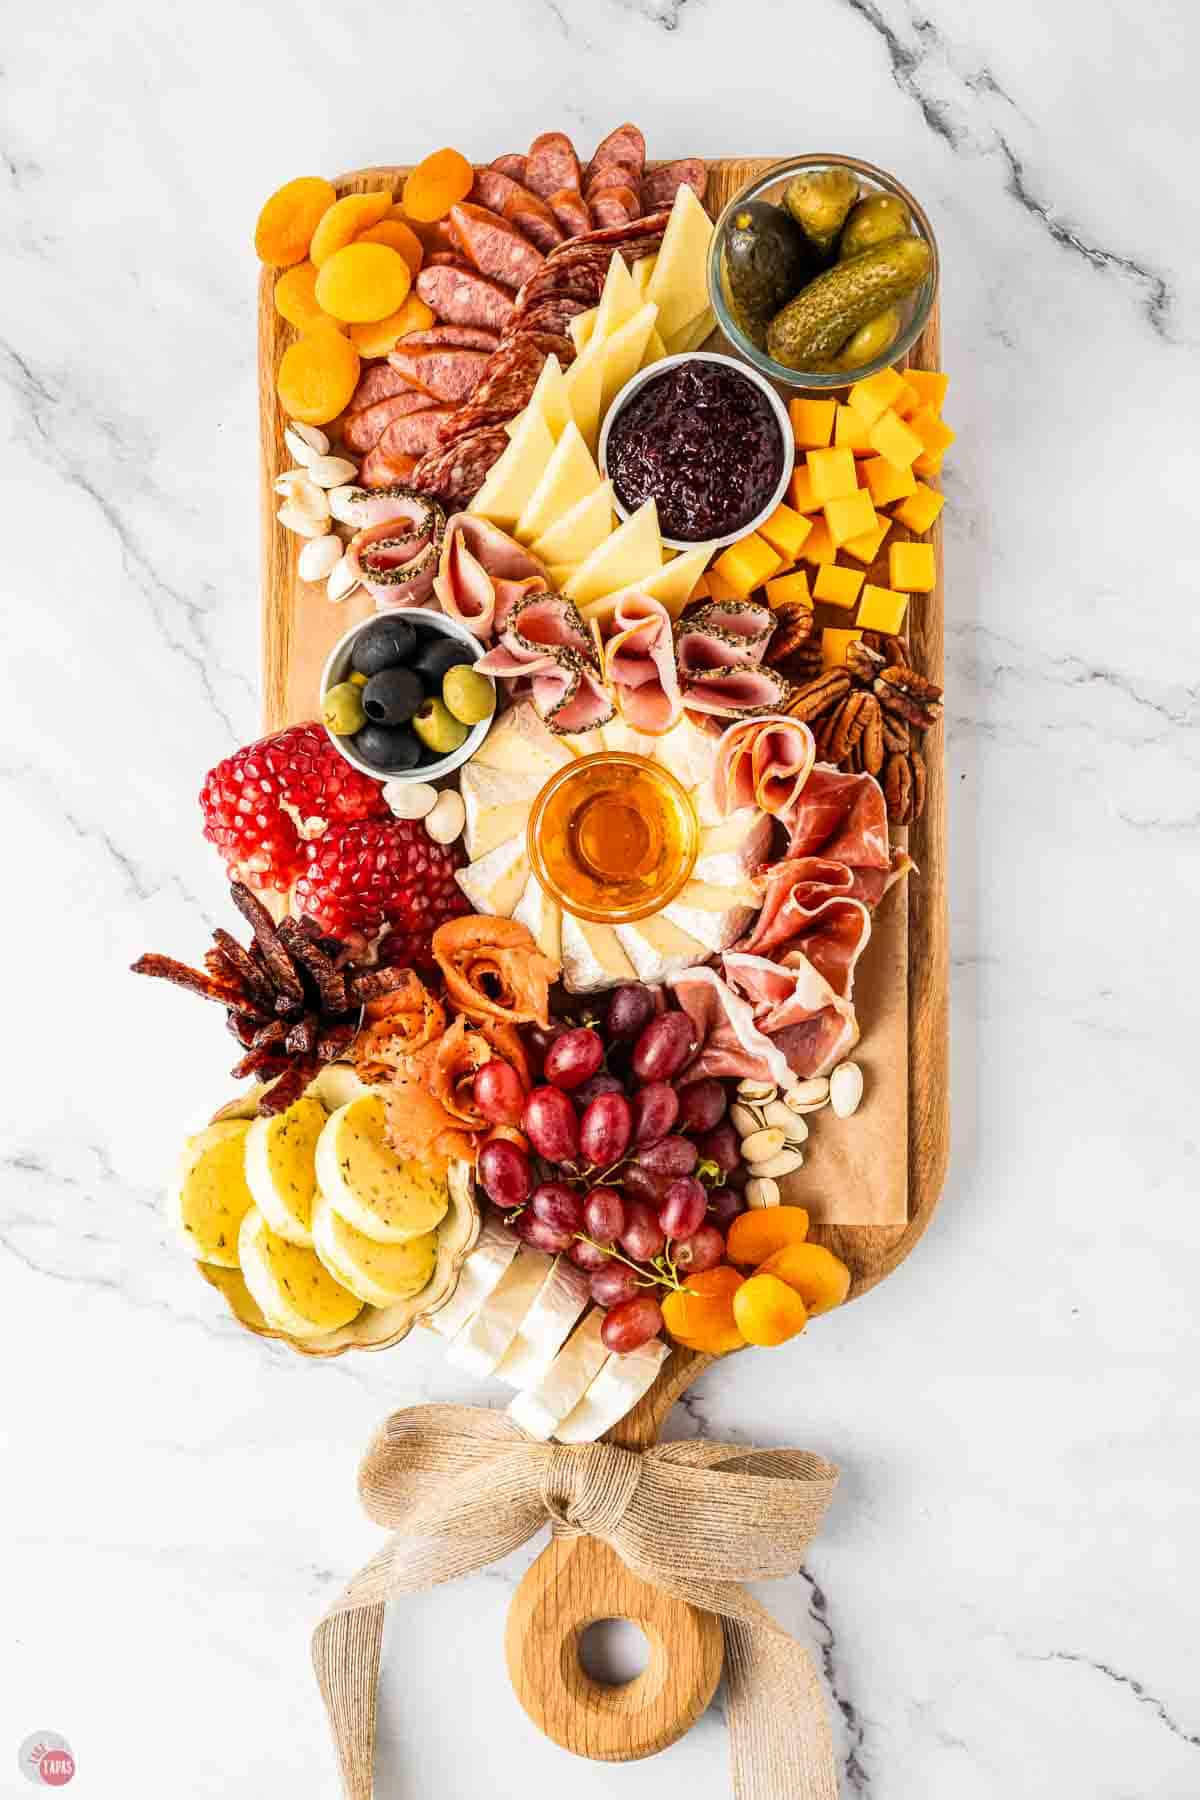
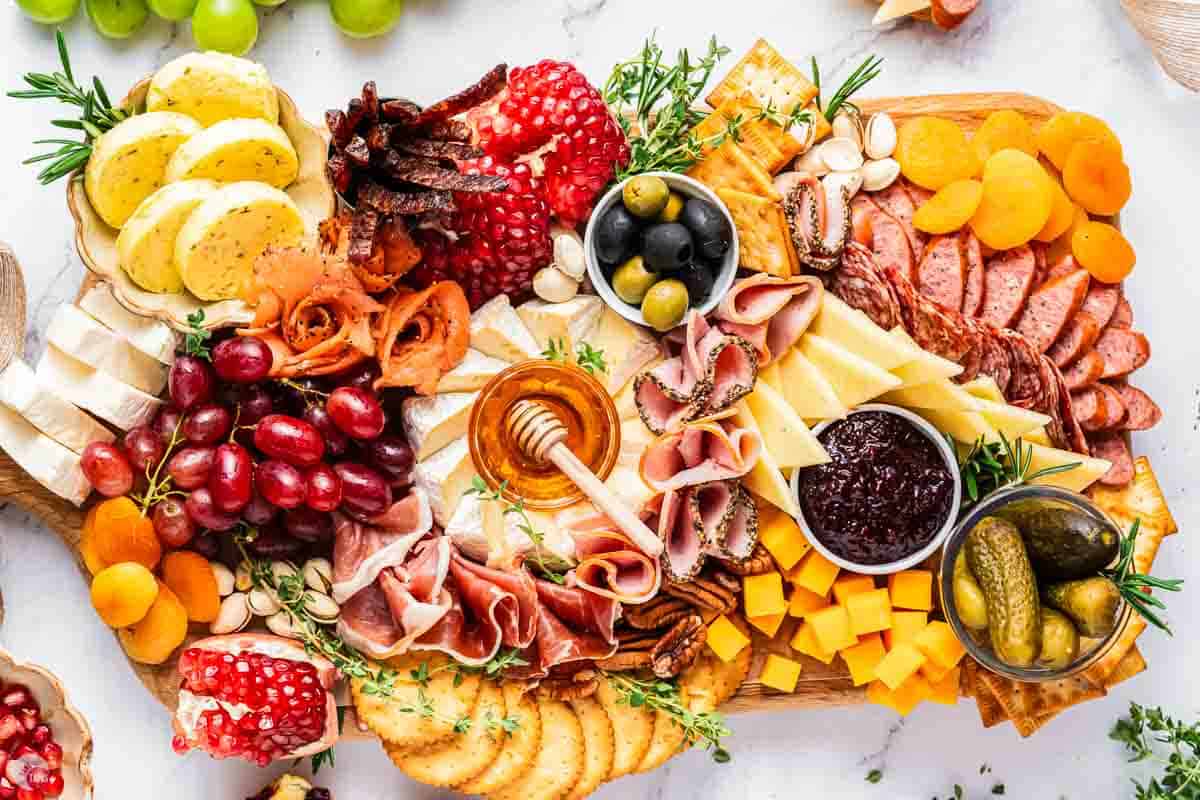
- Fill in Gaps with Fruits & Nuts: Add colorful fruits, nuts, and smaller items in empty spaces. This is a time to work with colors and textures.
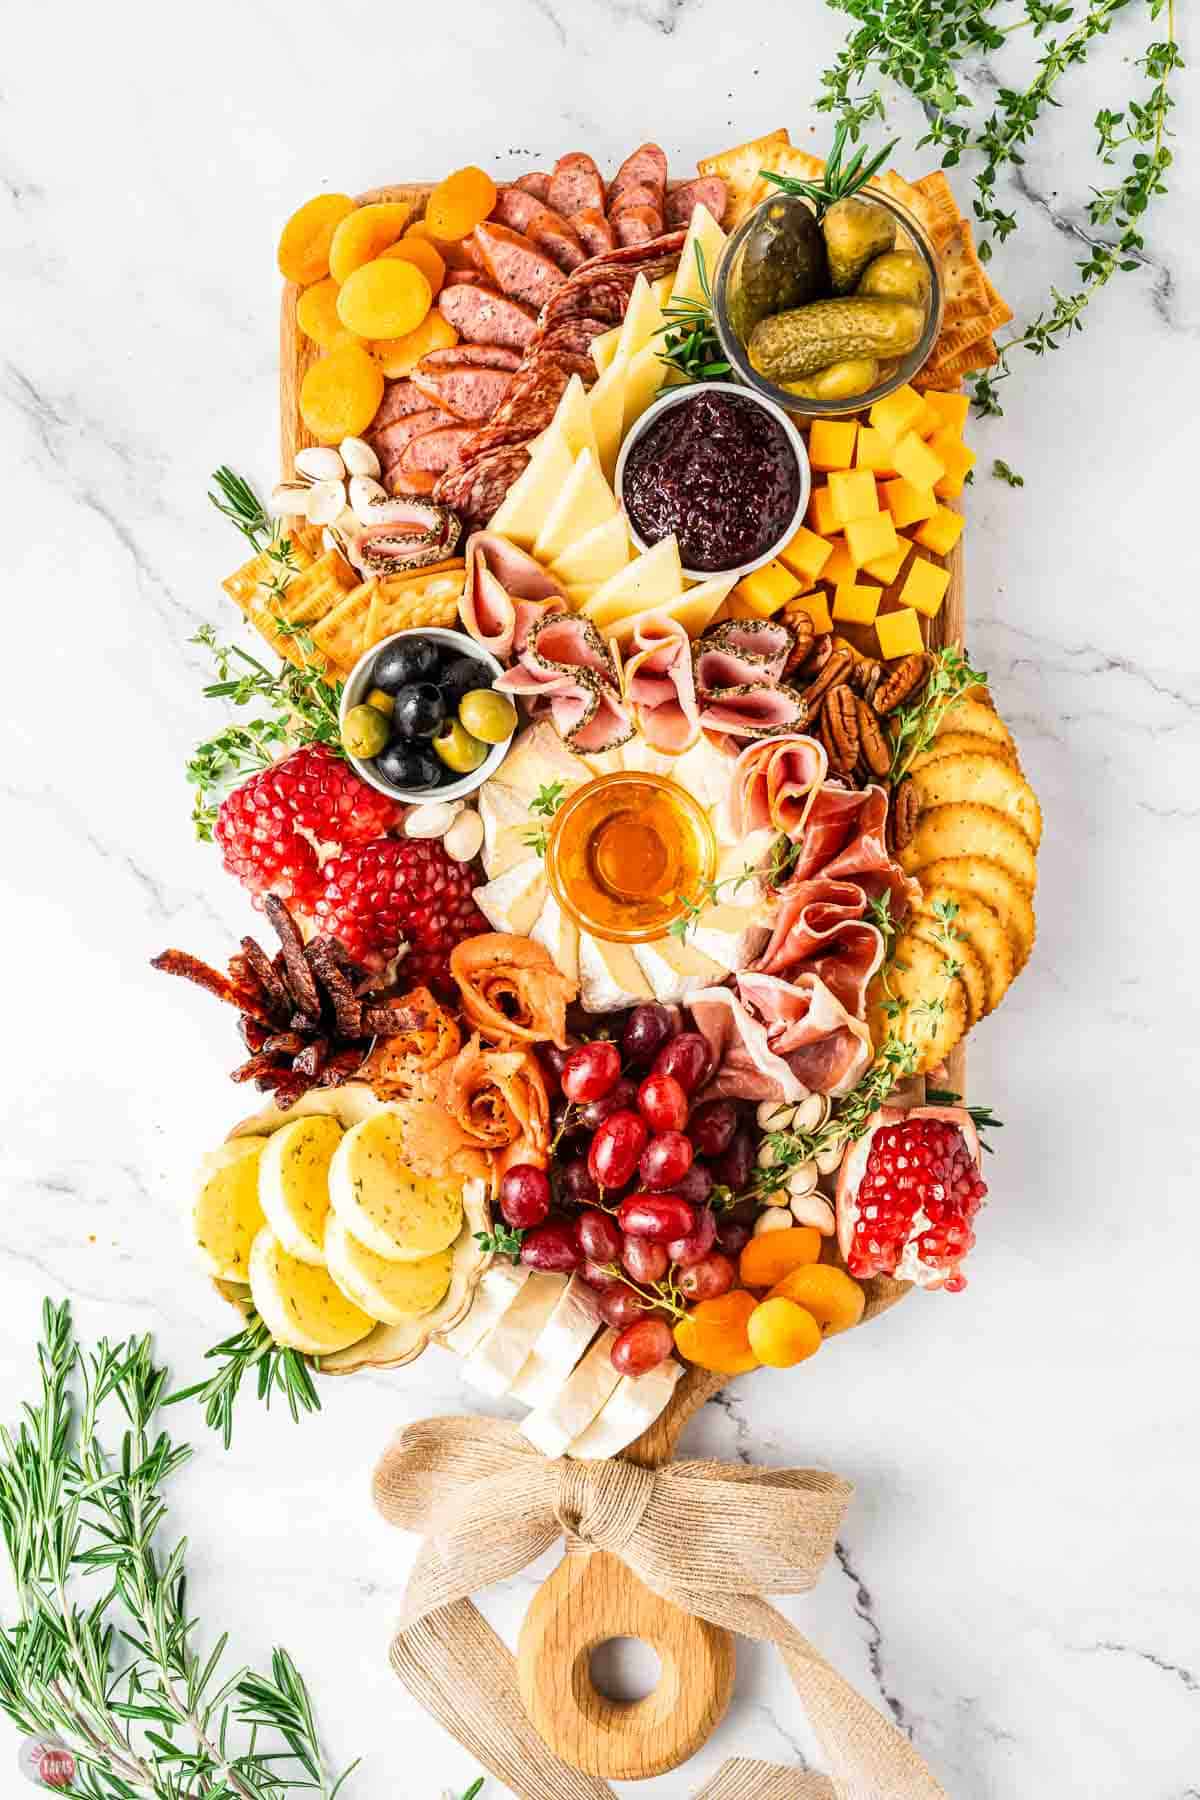
- Garnish with Fresh Herbs Tuck fresh herbs (rosemary, thyme, basil, parsley) in transition spaces. It fills in gaps and makes everything look pretty.
- Add Utensils: Don’t forget the tools your guests will need to grab their favorite items and some small plates or napkins.
Tools I Use:
- Small knives for cutting hard cheeses
- Spreaders for soft cheeses and jams
- Small spoons for mustards and spreads
- Toothpicks or tongs for olives and cheese cubes
- Small forks for pickles
Smart Grouping Strategies
- Group meats with their best cheese pairings: Place prosciutto near brie. Put salami near aged cheddar. Guests will naturally try combinations.
- Put spreads near their ideal partners: Fig jam next to brie. Mustard near hard cheeses. Honey near goat cheese.
- Cluster crackers near intended toppings: Place plain crackers by spreadable cheese and seeded crackers with strong cheese. It will help guests discover new combos!
- Use fresh herbs as barriers: Tuck rosemary or thyme between wet pickles and dry crackers. It helps to keep everything fresh and not soggy.
- Space out similar colors and textures: Don’t put all white cheeses together. Break them up with fruits, meats, and nuts to make them look more appealing.
Meat, Cheese & Spread Combinations
When you are placing items on your charcuterie board, try and group them next items that they pair well with. Here are a few classic combinations to get you started.
- Prosciutto + Brie + Fig Jam: Salty meat, creamy cheese, and sweet jam. Perfect balance.
- Salami + Aged Cheddar + Grainy Mustard: Bold, sharp, tangy. Classic deli combo.
- Soppressata + Goat Cheese + Honey: Spicy meat, tangy cheese, sweet honey. New, bold flavors.
- Smoked Salmon + Cream Cheese + Capers: Bagel-inspired perfection.
- Blue Cheese + Walnuts + Honey: Bold cheese needs bold partners.
- Manchego + Prosciutto + Quince Paste: Spanish inspired.
- Gruyere + Smoked Ham + Apricot Jam: French style favorite
- Brie + Pecans + Raspberry Jam: Creamy, crunchy, and fruity.
Themed Charcuterie Boards
Not only are charcuterie boards great for holidays, they work well for regular occasions. Think about game night, book club, girl’s night in, a wine pairing, date night at home, birthday parties, and showers.
- Halloween Board: Perfect for getting some savory snacks in before all the candy. Use a pumpkin cheese ball, orange cheddar, and white brie arranged in stripes. Black olives, dark grapes, orange or yellow bell pepper slices keep the theme going. Pretzel sticks can be “bones” and candy corn adds a sweet touch.
- Fall or Thanksgiving Board: Serve one to keep everyone out of the kitchen while you’re cooking the turkey and stuffing. Try cranberry goat cheese, aged cheddar, and apple slices. Fill in the gaps with candied pecans, figs, and pomegranates. Fresh cranberries make a great garnish with lots of color!
- Valentine’s Day Board: Perfect for you and your special someone. Skip the busy restaurants and have a movie night while grazing. Cut the cheeses into heart shapes, make salami or prosciutto roses. Add some red fruits like strawberries and cherries, and sprinkle in some dark chocolate squares or truffles.
- Football Game Day Board: Great for tailgating! Use pepperoni and salami to give pizza vibes and cut the cheese into cubes or football shapes. Add in some game day snacks like potato chips and pretzels for crunch, some spicy mustard and pickles for a flavor contrast. Bring it all together with team colors candies like m&ms or jelly beans.
- Spring Board: Perfect for Easter, brunch, a bridal or baby shower, and Mother’s Day. Use light or mild cheeses with honey, opt for turkey or ham instead of the cured meats, add fresh berries, and garnish with edible flowers. The sweet part is easy with mints, small cookies, or even those pastel “Peeps” everyone loves.
- Christmas Board: I have a snack platter you can check out! These are great for Christmas eve or any holiday party. Use red and green items like strawberries and raspberries. Arrange the meat and cheese in a wreath or Christmas tree and use rosemary sprigs as a garnish. This spread is easy to make into shapes and my hedgehog cheese ball is so cute!
Honestly? Any time you need to feed people (even just yourself) without actually cooking. If you have a specific occasion, you can always go with a theme.
Tips for Assembling a Charcuterie Board
Make Ahead Strategy:
- Wash fruits ahead of time
- Pre-slice cheeses that need it (wait until last minute for best results)
- Use placeholder items (empty bowls/glasses) for things that need to stay cold
- Store pickles and wet items in small zip-top bags in their designated spots
- Add them when ready to serve
If You’re Short on Space:
- Use two smaller boards side by side
- Combine items onto one tray as food disappears
- “Fluff up” the board by rearranging as party continues
Visual Tricks:
- Vary heights with small bowls and tall glasses.
- Create diagonal lines across the board.
- Use odd numbers (groups of 3 or 5 look more natural).
- Leave some “breathing room.” Don’t pack everything too tight or stack items.

Frequently Asked Questions
Assemble up to 2-3 hours ahead. Cover loosely with plastic wrap and refrigerate. Let sit at room temp 30 minutes before serving for best flavor.
About 2 hours at room temperature. After that, perishable items (cheese, meat) should be refrigerated. You can always serve on a chilled platter and replenish as needed!
Stick with the 3-3-3 rule but use smaller quantities. One meat, one cheese, one cracker works for very small boards (2-4 people).
Nope! Grocery store deli pre-packaged options work great. They even have groups of meats, cheeses, and olives already packaged together and are budget friendly.
Fill in gaps by moving items closer together. Add more crackers, nuts, and fruits as they disappear (easier to replenish than cheese and meat).
Start simple: cheddar, brie, goat cheese spread. Salami, prosciutto, summer sausage. Grapes and crackers. Done!
Absolutely! Skip the meats, add more cheeses, nuts, fruits, vegetables, hummus, and spreads.
Things to AVOID
- Overcrowding or stacking items: Guests need space to grab things without disturbing other items. Stacking makes it hard to access items underneath.
- Serving foods with pits, large seeds, or shells: Nobody wants to figure out where to put olive pits, inedible seeds, or nut shells at a party. Remove them first or use pitted/shelled items.
- Grouping strong cheeses next to mild ones: Blue cheese next to mild brie? The strong flavor will overpower. Space them apart for best results.
- Including items that are too wet or watery: Drain items and pat them dry. I’m talking about fresh mozzarella balls, sliced tomatoes, extra juicy fruit, etc. They can make things soggy.
- Putting everything in bowls: Too many bowls makes it look like a condiment stand. Use bowls only for wet items (olives, pickles, spreads).
- Using low quality foods: Cheap processed cheese, mystery meat logs, or stale crackers. Your board deserves better and so do your guests. You can find quality items even on a budget.
- Using pre-cut cheese slices: It dries out quickly and looks sad. Buy it in blocks. You can cut it fresh into cubes, slices, triangles, or different shapes for your occasion.
If you love this recipe as much as I do, please leave us a ⭐️⭐️⭐️⭐️⭐️ five-star review in the comment section below. Thanks!

Charcuterie Board
Ingredients
Cheeses
- 8 ounces Soft cheeses: Brie, Garlic cheese spread
- 8 ounces Semi-soft cheese: Swiss
- 8 ounces Hard Cheeses: Cheddar, Gruyere
Spreads
- 2 ounces Honey
- 2 ounces Raspberry jam
Meats
- 4 ounces Deli meats: smoked ham
- 4 ounces Cured meats: Salami, Proscuitto, Sausage
- 4 ounces Other meats: Smoked salmon
Crackers & Bread
- 12 ounces Water crackers, Triscuits, Crostini, etc.
Fruits
- 1 cup Pomegranate seeds
- 1 pound Grapes red and green
- 1 cup Dried apricots
Pickles
- ½ cup Black olives
- ½ cup Green olives
- 2 ounces Gherkins
Nuts & Extras
- ½ cup Toasted Pecans
- ¼ cup Pistachios
Garnishes
- Fresh herbs like rosemary, thyme, and parsley for garnish
Instructions
Start With Cheese and Bowls
- Your cheeses are your anchors. Space them out around the board first.
- Next, add anything in bowls like spreads, jams, olives, pickles, and mustards. Be sure to space these out too. I like to create three spots on the board for the cheeses/bowls and then fan everything out from those spots.
Add The Meats
- Fold or fan your meats to make them look fancy.
- You can fold salami into quarters, fan out prosciutto in ruffled waves, roll soppressata into cylinders, stand up sausage slices in rows, or make salami flowers.
- Group meats near cheeses they pair well with.
Place The Crackers
- Space out different types around the board. Place them near their intended cheese or meat pairings.
Fill In The Gaps
- Add colorful fruits, nuts, and smaller items in empty spaces. This is a time to work with colors and textures.
- For example: Place bright red strawberries next to white cheese, dark olives near light crackers, and use green grapes to break up the different meat sections.
Garnish
- Tuck fresh herbs (rosemary, thyme, basil, parsley) in transition spaces. It breaks up items with similar colors and textures.
- They create barriers between wet pickles and dry crackers to keep everything fresh.
Add Utensils and Serving Items
- Don’t forget the tools your guests will need to grab their favorite items. You will mostly likely need the following:
- Small knives for cutting hard cheeses, Spreaders for soft cheeses and jams, Small spoons for mustards and spreads, Toothpicks or tongs for olives and cheese cubes, Small forks for pickles
- Serve and enjoy!
Notes
- Overcrowding or stacking items: Guests need space to grab things without disturbing other items. Stacking makes it hard to access items underneath.
- Serving foods with pits, large seeds, or shells: Nobody wants to figure out where to put olive pits, inedible seeds, or nut shells at a party. Remove them first or use pitted/shelled items.
- Grouping strong cheeses next to mild ones: Blue cheese next to mild brie? The strong flavor will overpower. Space them apart for best results.
- Including items that are too wet or watery: Drain items and pat them dry. I’m talking about fresh mozzarella balls, sliced tomatoes, extra juicy fruit, etc. They can make things soggy.
- Putting everything in bowls: Too many bowls makes it look like a condiment stand. Use bowls only for wet items (olives, pickles, spreads).
- Using low quality foods: Cheap processed cheese, mystery meat logs, or stale crackers. Your board deserves better and so do your guests. You can find quality items even on a budget.
- Using pre-cut cheese slices: It dries out quickly and looks sad. Buy it in blocks. You can cut it fresh into cubes, slices, triangles, or different shapes for your occasion.
Nutrition
Now that I have armed you with some basics and a few tips in this charcuterie board guide, go and make delicious cheese platter for your next party!
{Originally posted 10/20/2016 – photos and recipe notes updated 01/10/26}
©TakeTwoTapas.com. Content and photographs are copyright protected. Sharing of this recipe is both encouraged and appreciated. Copying and/or pasting full recipes to any social media is strictly prohibited.

LOVE Take Two Tapas! Bookmarked it for sure!
This site is filled with all sorts of much needed information, not only for the new entertainer, but also for those who have been entertaining for years, or for those who bring a “board” of any kind to a host’s home. Whether you bring a tray or serve a tray at your home, you will be the bomb!
The “pandemic” is winding down – I hope, however buggy season with the no-see-ums is upon us so I’ll be entertaining indoors – I found this site just in time.
Before I close, I have a question, the tray that you show – the one with the higher sides (so nothing falls off of or out of the tray)…where did you get it? I like it a lot!
Thank you so much for reading! I love a great board and most nights that’s what we eat for dinner. The green board? I got it at Home Goods a few years ago when I was looking for a tray with high sides. I was bringing food to neighbors and it kept sliding all over the car LOL.
Awesome tips that everyone can follow through when creating a cheeseboard.
I just saw this cheese board idea post while looking for hearty appetizer recipes for an upcoming Christmas party and I have to say “WOW!!” I love all your suggestions, and the presentation is fantastic. I too have combined cheeses with meats and fruits and crackers, but hadn’t thought of putting spreads on the same tray. Using empty bowls as place holders ahead of time is genius. And the little sprigs of herbs add so much to the overall look. Using parchment lined wood trays with sides is also a great suggestion.
Thank you for all the wonderful ideas.
Thank you so much!
I love how beautiful your cheese board is. Mine always look so empty and sad. I like how you have so much going on in the trays. Im bookmarking this so I have it for the holid
I’m a cheese monger with murray’s Cheese also suggest when choosing your cheese go from mild to wild with your selections. Nice job on your construction of the board.
Thank you so much! That means a lot from a Cheese Monger! I love to pick something mild, something to stretch their taste buds, and then something spreadable! I would love some advice on new cheeses to try!!
Do guests just pick up with fingers or should we provide party picks?
Hi Deborah! Jen is away for a few days, but when I made these for New Years day I had people pick them up with their fingers. Hope you enjoy them as much as we did! ~michele
Hi there, these look so great!! I am excited to try it but do have one question… I know, I know, you already did step by step :p but between picture 1 and 2 there is something on the apricot tray that you didn’t mention ( or I missed despite rereading it) and it looks delicious so now I am highly curious what the soft yellow folded pile is? It is also pretty. Now i am off to go buy a tray 😉
Thank you so much for reading! The flowery item between the two salamis is provolone cheese that I cut in half and rolled up. I place them on their side to make them easier to pick up. It was an extra cheese but I love it so much I thought it owuld be good.I hope you will post or send me a picture of your finished creation! Happy Holidays and Merry Christmas
Oh! Excellent, it is so so pretty!! Thank you for responding so promptly 🙂 Merry Christmas and I will share a pic when I am done 🙂
I can’t wait to see them!
I love cheese so much! My family actually has a night called “pretentious cheese night” where we buy a ‘fancy’ cheese and share it with everyone. I think I’m going to have to blow them out of the water with this cheese tray.
Thank you! Take pictures!!!
Your cheese board looks really pretty. I would love seeing this on my table. My friends surely would love this 🙂
Yay, I love this post. My schedule for next month is almost full for the series of Christmas parties. This is a great idea on what to bring to those parties.
The Cheese Board concept is so innovative and creative. Love the beautiful way that you have arranged the board. There is a symmetry without monotony in the presentation.
Your cheese board is GORGEOUS, haha honestly. You are indeed a pro now. Thanks for telling us all about it! I would have never known how to make any cheese board, but now I know how to make a cheese board I’d be proud to show off.
Thank you so much!
Wow we’ve just moved into our new place and plan on having a house warming soon and this would be so useful to have as inspiration!
Helen
Thank you! Take some pics so I can see how it turns out and congrats on your new place!
What a gorgeous looking cheese board. I’ve always been intimidated but love how you broke it down and will surely try to remember that tip of using placeholders
Thank you! I got that idea from my mother in law who also recommends setting out all your serving dishes the night before with tags on them so we make sure all the dishes have a place to sit on the table.
This is just fantastic! Thje colours. deco and the way everything is set up. Just perfect for when we have friends over. I would not want to share this one!
I love a good cheese board, and wish that everyone put them together as thoughtfully as you! I NEVER skip the cheese course if I see it available at a restaurant!
Me either! I would rather have a larger portion of the cheese course for my dinner!
Wow – those cheese boards are so pretty! And, with the exception of just one item, everything else I love! The tip about lining the boards with parchment is a great idea. I have stained so many of my boards with cheese and other oily items by not doing that. 🙂
Thanks Byron! I have ruined quite a few too!
This was the perfect guide for a cheese plate! I made one last night for a Christmas party based on this post and it turned out beautiful and was a hit at the party. Thank you!
Thank you so much, Cameron! I would love to see some pictures if you have them!!
Holy moly! This is so awesomely done that I’m changing gears on my Christmas party menu now. Fantastic job!
Thank you so much! It has really helped me feel less stressed about serving foods that everyone likes.
This post is amazing. Your writing style is amusing, great! I’ve already used this guide once, and I’m using it again 2 weeks later. Every time I have dinner guests, I will use it! Thank you so much for writing a truly usable post. Already pinned, thanks again.
Thanks Erica! I am so glad that you like it! I use cheese boards all the time now since they are easy to feed a picky crowd! Send photos of your next one so I can see!
Oh wow, your cheese boards look amazing! And such a comprehensive guide!
Thanks Heather!
Perfect ! I’m having friends over tonight, I Will make this cheese board.
Hope they love it!
I think they turned out gorgeous! I want to dig in right now! Stopping by from Friendship Friday. Hope you have a great weekend!
I think they turned out gorgeous! I want to dig in right now! Stopping by from Friendship Friday. Hope you have a great weekend!
This is perfect! Pinning for later…..
Can I tell you how much I love this post?! You deconstructed the cheese board so that anyone could put one together, even one of my teenagers. And it all looks delicious too!
Thanks Michelle!
This looks so beautiful and delicious!
Thanks Justine!
Loving the color, flavors, and how healthy these appetizers will be. Can’t wait to make it for a dinner party. Thanks for sharing! Stopping by from the Create and Crave party.
I love your simple step by step instructions and visuals. My cheese boards never look this pretty, so I’m going to use some of your tips! Thanks!
They will be awesome!
One of my favorite party treats!! This is gorgeous!
Thanks Michaela!
Truly, a good meat, fruit and cheese platter is just heaven on a plate! I could eat this all day long!
Me too!
I’m going to use this with the up coming holidays! I LOVE a Cheese Board (I love cheese) and your selections look gorg and yum!
Hope it is a hit at your house too!
That’s so pretty!! I love the herbs in the side Thanks for sharing on the What’s for Dinner link up and don’t forget to leave a comment at the party – Next week’s features that also leave a comment get pinned, yummed and tweeted!
Love this cheese primer for entertaining or just for enjoying at home with a friend, which we are doing this very minute. Your cheese board looks incredibly delicious; thanks for putting this great post together!
Thanks so much!
I do cheeseboards all the time, sometimes just for us, for our dinner but mine never look as gorgeous as yours does. I’m definitely going to use your tips to try and put together one that’s just as pretty!
Thanks Lisa! It’s like the perfect meal!
This is lovely! Thanks for the tips and tricks. And, now, I just need to come over to your house to enjoy this cheese board with you! I love cheese!
Me too Debi! Thanks so much!
I love everything about this post. I love making meat and cheese trays for guests and always looking at beautiful ways to display them.
I could eat them for dinner all the time!
Love how you show how to put this together step by step. For some of us, picking the right foods is not so hard but making it look good is! Thank you!
Thanks Beth!! I am still not very good at it but I am constantly asking my mother in law to teach me something new!
This is THE BEST Cheeseboard tutorial I have ever read!! I really wish I was around to absolutely demolish that tray! Just put that infront of me with a couple of bottles of wine, and I will be in heaven!!
That combo of wine and cheese board is going to be my Saturday night dinner for the rest if eternity!
This isn’t new but I suddenly feel like re-iterating that you are invited to every single party I ever have from now on until the end of time, m’kay?
I’m there!!